 |
Woodturning Gallery & Workshop |
|
Personal Favourites

I turn because I love to. In this section you will find a gallery of my favourite pieces.
I hope you like them too. |
Turning Projects

I thought you might like to see how I turn a few different pieces. I am self taught and I like doing things my way!
|
Woodturning Gear
As well as buying some really good tools, I also make my own. Hollowing tools, chuck jaws and lots more besides.
|

*COMING SOON* Click this banner to go to my shop on Etsy (opens in a new window)
Personal Favourites
|
This is a gallery showing some of my favourite pieces that I have turned and most I have already sold. Some I like partly because of how challenging and technically difficult they were to turn and others were quite easy to turn but the figuring in the timber was just so beautiful.
There are other pieces that aren't in this gallery that I really liked too but unfortunately I sold them before I got a chance to take a photograph but I'm certainly not complaining about that! You can either scroll down or click on any of the images on the right to go straight to that piece. If you want a closer look, each image below has a larger version if you click on it. If you see anything you like and wonder how or why I decide what each piece should look like when it's done, click HERE to find out why I make things the way I do. |
       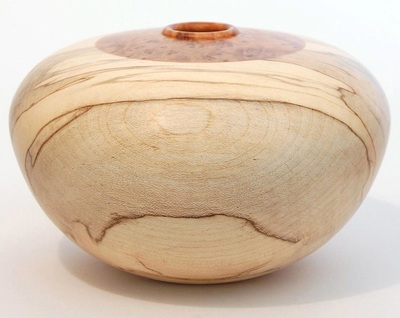         |

Spalted Beech & Ebony Hollow Vessel
|
Spalted Beech & Ebony Hollow Vessel
I've made more intricate items, worked with some of the most exquisite and expensive species of timber the world has to offer but this hollow vessel is simple in comparison, from humble beginnings and probably my favourite piece to date.
I got the beech about half a mile from where I live and spalted it myself (in very basic terms, spalting is a totally natural process and it causes the dark lines and different patches of colour in the wood). I like my timber heavily spalted and as spalting can render valuable timber worthless if it goes too far, commercially spalted timber is usually far less spalted and therefore not as interesting and dramatic. Heavily spalted timber is a challenge to turn and finish but absolutely worth the effort. The rings are made of maple and ebony veneer sandwiched between the body and neck to add a complimentary detail to the colours already present in the rest of the piece. |

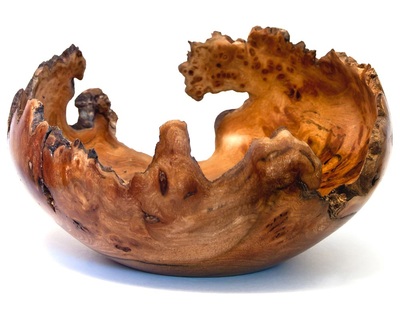
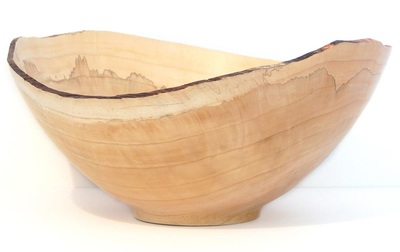
Elm Burr Natural Edge Bowl
|
Elm Burr Natural Edge Bowl
If you are a woodturner, you'll know what it takes to turn something like this. If you aren't, well let's just say that if adrenaline junkies did woodturning, this is what they would be doing!
Let me explain. Like a helicopters rotor or fan blades, all the jagged edges on this go almost invisible when spinning at hundreds of RPMs on a lathe. At the same time as this is spinning, one hand is a fraction of an inch away from the highest point on the rim to ensure good tool control. As you go deeper and thinner, the gaps get bigger and the odds of something going wrong go up. Oh, and don't forget, I had to sand and polish this this as well! Seriously though, I've done quite a few natural edge pieces so I'm used to the risks but I would not try this if you are a beginner. |

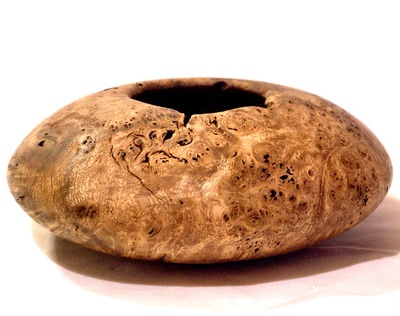
'Flotsam' Canoe Tree Burr Hollow Vessel
|
'Flotsam' Canoe Tree Burr Hollow Vessel
This was one of the pieces I had in Stockport art gallery and I'm proud to say that it was bought by the curator of the gallery!
I called this piece 'Flotsam' because it reminds me of some sort of giant seed pod that could have been floating on the sea for years before washing up on a beach. Canoe tree burr is quite unusual wood to work with as it is more like turning cork than timber so it needs very sharp tools and a light touch to work with it. If the burr is anything to go by, I imagine that the solid timber from the tree would make excellent canoes. It's very light so it would be buoyant and easy to move to and from the water and I bet it would probably still float even if you chopped it in half! |
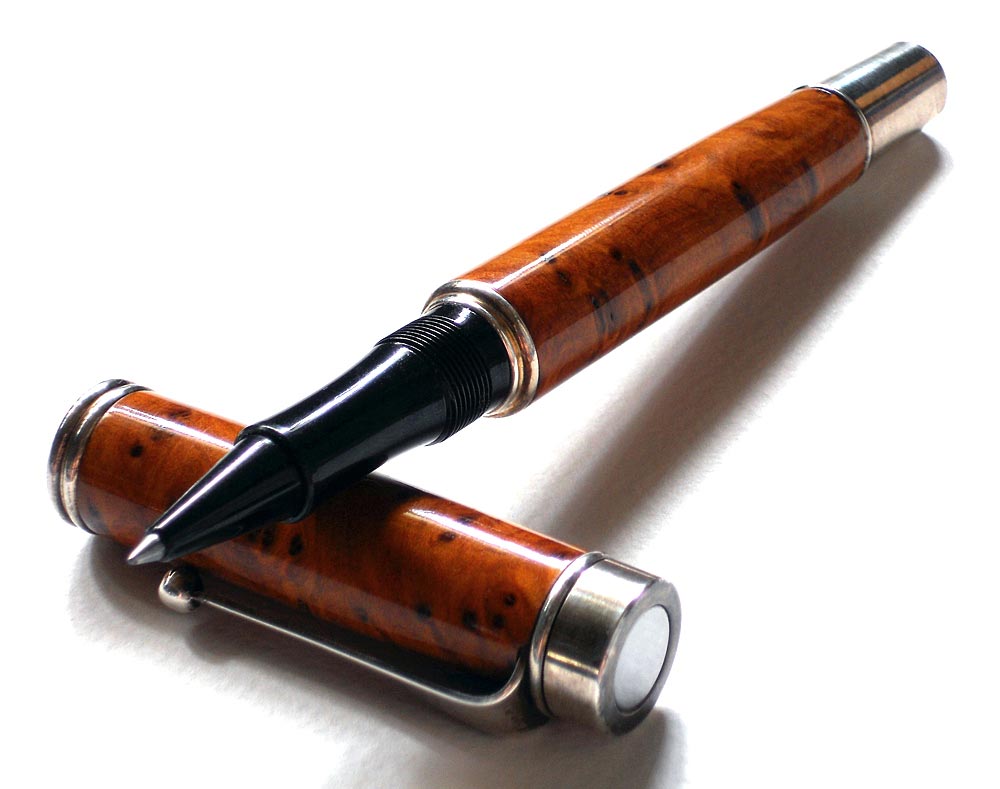
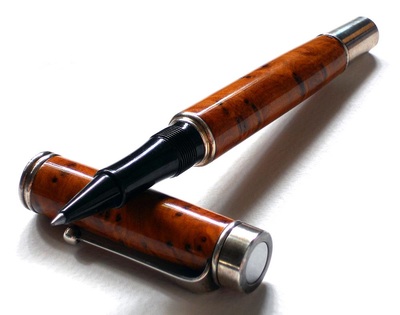
Thuya Burr & Silver Rollerball Pen
|
Thuya Burr & Silver Rollerball Pen
If you like big, weighty pens, this is the one for you! I've never been a fan of little plastic Biro type pens because they are too light and flimsy feeling plus they make my handwriting look even more scribbly than it already is. My weapon of choice for writing is a fountain pen but a good rollerball is just as nice without the leaking and other drawbacks in my opinion.
After I had made dozens of pens for other people, I decided to treat myself and make one for myself and this is it. A thuya burr and silver president pen. I taught myself how to do a special burnished melamine lacquer finishing process which although costly, is exceptionally hard wearing and it's the same finish I use on my other wood pens. |
Masur Birch Vase
|
Masur Birch Vase
Beautiful wood, isn't it? Such a shame that this rare timber is being clear cut and mostly turned to pulp or burnt to make way for planting a cash crop of conifers. To find a birch tree with this figuring is rare and it's just lucky that some of the timber is spotted in time to let us woodworkers use it instead of it being turned to ash.
In a nutshell, this is a perfect example of what makes me feel hypocritical about being a woodturner. I love working with rare and exotic wood. No doubt about it but I also love trees and would much rather see them alive than in pieces. Nothing I or any other woodworker has or ever will make could possibly compare to the majesty of a giant sequoia or the inescapable beauty of the fall colours of New England. That's why I always try to make the beauty of the wood itself be the main focus of a piece. Mother nature is the true artist, I just make the canvas. As an aside, although it may look like there is quite a heavy texture to this wood (seemingly more apparent on the top third of the piece on the right hand side), it's actually silky smooth and almost impossible to feel the figuring and it's caused by a 3D effect in the grain of the wood called chatoyance (it's cool, Google it!). This wood has a hidden treat for anyone lucky enough to work with it, it smells of fresh redskin peanuts! I've turned plenty of normal birch and that has a similar nutty smell but not nearly as pronounced as masur birch. |
Bloodwood & Ziracote Segmented Vessel
|
Bloodwood & Ziracote Segmented Vessel
73 individual pieces of wood went into making this! 16 Bloodwood staves, 36 pieces of maple veneer, 18 pieces of ebony veneer, 2 ziracote discs and 1 sacrificial disc of maple.
This was two weeks in the making due to the amount of cutting, sanding and needing to glue up in lots of little stages. the turning actually was the shortest part of the whole process and was done in a day. I wouldn't have even attempted this without my DIY lathe mounted sanding disc & table (which I explain how to make HERE. I used the Mk.II table for this piece). I don't make pieces like this very often as I prefer to work more freely and without all the constraints of specific measurements and the potential issues that come with working that way which is also why I'll never take commission work but every so often, I get an idea in my head and I can't concentrate until I've made it! |
L.O.T.R. Poplar Bowl With Pyrography & Ebonised Detail
|
L.O.T.R. Poplar Bowl With Pyrography & Ebonised Detail
Poplar is a nice wood to work with but it is a bit.... erm.... bland if I'm being honest. I had just recently finished reading the full works of J.R.R. Tolkien and had also watched the Lord Of The Rings trilogy not too long before I turned this.
As I mentioned, poplar is very uniform in appearance so I didn't have to worry about hiding anything pretty in the wood itself which gave me total freedom to go crazy with the decoration so I did! The concept behind this piece is as follows: This is a relic found in middle earth many years after the stories take place. The writing is an older form of elvish similar to that found on the ring which could be some type of spell but centuries of neglect have damaged the glaze making it impossible to read but the underlying black material from which it is made reveals a possibly sinister origin. Not bad, eh? |

Spalted Sycamore & Thuya Burr Hollow Vessel
|
Spalted Sycamore & Thuya Burr Hollow Vessel
Spalted sycamore is usually more subtle in appearance than spalted beech but no less beautiful.
I wanted to keep the form of this very simple but as I neared the final shape, I felt it needed something which is why I added the thuya burr. The thuya has lots of small and intricate details and the spalted sycamore has big, sweeping areas of shapes and colours so although contrasting in their appearance, I think they work well together. |
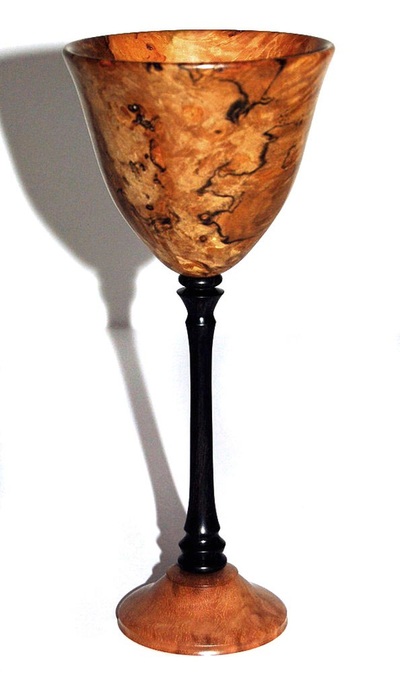
Manzanita Burr & Ebony Goblet
|
Manzanita Burr & Ebony Goblet
Although beautiful in it's own right, this piece of manzanita burr also had spalting which meant I had to have it! I used ebony for the stem to compliment the black spalting lines.
You wouldn't believe the amount of times at the craft fair I got asked if you could drink wine from it. I took it as a compliment but my answer was always the same, "Yes, once probably!". Unless stated in the title or description, most of my pieces are made to be decorative in their own right, that's why I specifically choose and use the most well figured or otherwise beautiful and interesting wood. To be honest, it's a fair question. I mean just for example, if I made a hammer from the most expensive wood on the planet with the intention that it might be given to a carpenter as a retirement gift, I would still expect someone to ask if it can knock nails in. Hey, once you've paid for it, it's yours to do with what you want. The thought does make me cringe though! Back to the goblet. I'm not a wine drinker but I am drawn to the elegant form of wine glasses, goblets and champagne flutes. I think the shape and the delicacy of the more expensive ones is a beautiful thing so I wanted to replicate that in wood as traditional wooden drinking vessels are usually quite clunky in their form. |

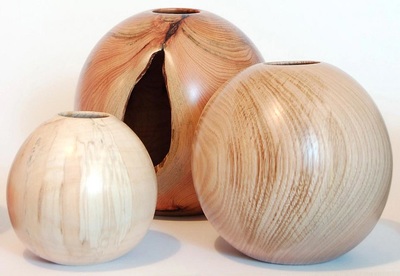
Juniper, Chestnut & Spalted Birch Vessels
|
Juniper, Chestnut & Spalted Birch Vessels
These were interesting to turn. The juniper was a challenge with the bark inclusion in the side which became a hole as I hollowed the inside to 1/8th of an inch thick plus it had a nice peppery smell.
The chestnut was a timber I hadn't turned before but it cuts cleanly so I'd like to work with it again and the little spalted birch vessel had some really pretty and delicate spalting and despite me turning it as a sphere, decided that it wanted to be more egg shaped so once it was thin enough, the wood fibres moved and released their stresses then settled into the shape you see in the picture. |
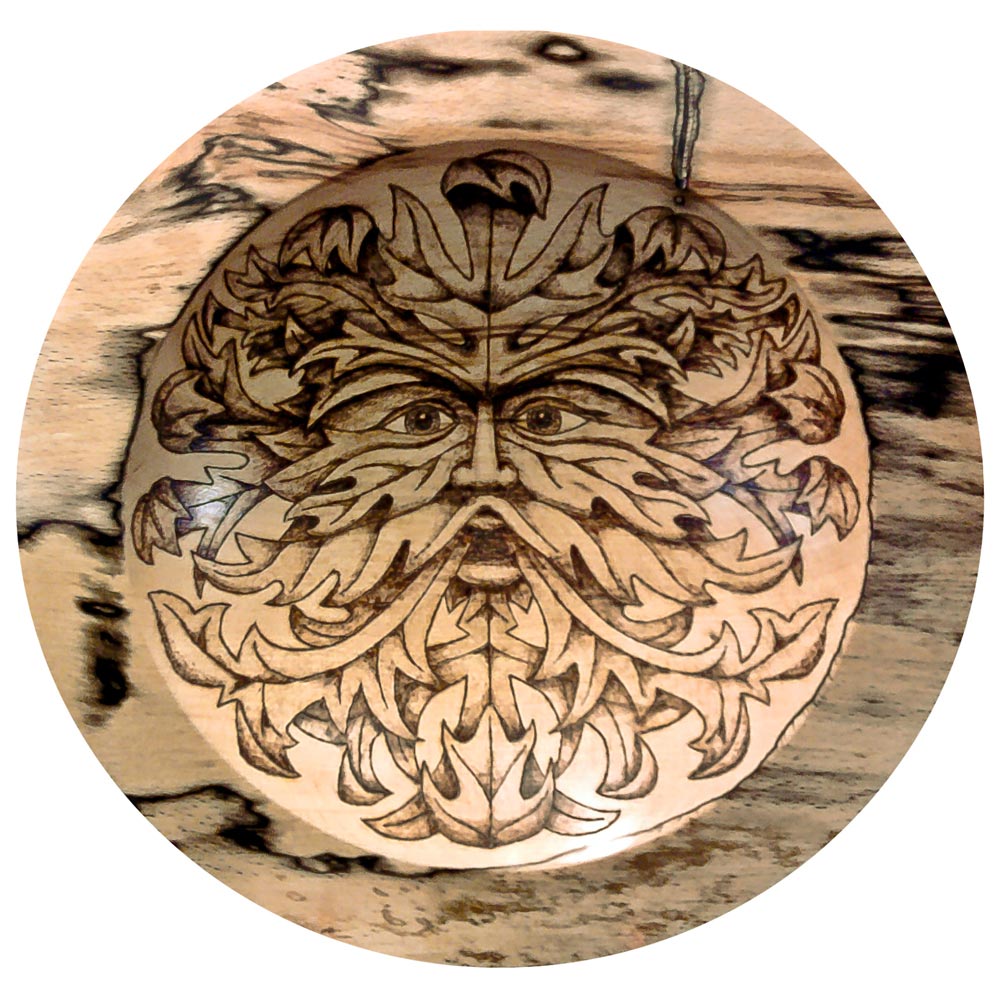
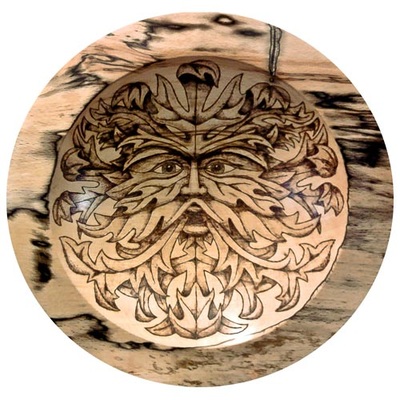
'The Green Man' Spalted Beech Bowl With Pyrography
|
'The Green Man' Spalted Beech Bowl With Pyrography
This was made from a piece of beech that had been spalted after it was cut into a plank and if you catch it at the right time, the spalting doesn't go too far into the wood so it leaves the centre of the bowl as normal and the flat spalted rim acts as a picture frame. I generally prefer to use wood that has been spalted 'in the round' (in log form) as the spalting runs right through the wood but surface spalted wood definitely has it's uses too.
I knew I wanted to do some pyrography work on this one but I hadn't settled on an idea until I turned this and saw two slightly lighter areas of grain where the eyes are then a light bulb flickered in my head and I started drawing him out. The green man is often portrayed as quite a grumpy looking fellow but that's not how I see him. |

Lawsons Cypress Natural Edge Saddle Bowl
|
Lawsons Cypress Natural Edge Saddle Bowl
Lawsons Cypress is a timber that you're quite unlikely to get hold of but if you do, you'll be glad you did. It's not rare but it's not a commercial timber either. With very sharp tools, it cuts cleanly and is easy to bring to a silky smooth finish.
One of the pleasures I get from turning is the huge range of fragrances that emanate from different species of timber as you turn them and this is no exception. Lawsons cypress is lemon scented. I was expecting a pine sap smell but nope, crisp, sweet lemon! |
Bulgarian Walnut & Ebony Lidded Bowl
|
Bulgarian Walnut & Ebony Lidded Bowl
I was very lucky to get my hands on two bowl blanks where the grain and figuring were matching and obviously used to be one piece. I don't mean that the two pieces were cut out of the same plank so the grain continues as they were next to each other, they're easy to find. These came out of two separate planks, one on top of the other.
They must have been cut, put in two different stacks at my timber supplier, one in the 8 inch square blank stack, one in the 6 inch square blank stack and I picked one from each and just went for the best figuring and grain as I always do. It was only when I looked at them in my workshop that I noticed I had picked a pair so they had to stay together! The bowl section had a small bark inclusion so I cleared it out, filled it with brass powder, fixed it with CA glue and brought it to a mirror finish which looked like gold. I called this piece 'Aurum' (Latin for gold) when it was in Stockport art gallery. I usually prefer wax or oil as the finish for my larger pieces but this is finished in a spray on melamine lacquer which I bring to a high gloss, mirror finish by hand burnishing using my secret technique. If you really want to know how it's done, I'll make a deal with you. As soon as I'm living in the Highlands, I will do a step by step tutorial explaining exactly what you need and how to do it. Deal? |
Brown Mallee Burr Natural Edge Bowl
|
Brown Mallee Burr Natural Edge Bowl
Tough as old boots but 10 times more beautiful. That's my take on mallee burr! A very nice Australian man who was visiting Derbyshire and came to the craft fair informed me that it's pronounced 'malley' like alley, not 'mah-lee' as I had previously been told. As it grows on his farm back in Oz, who am I to argue?
Ironically, another mallee piece I turned was bought by an Australian lady who took it back with her. From Australia to my timber supplier in Derbyshire as a chunk of burr. I went from Cheshire to Derbyshire and back to get it, I turned it and took it back to Derbyshire to sell it and it goes from Derbyshire back to Australia. That has to be one of my most travelled pieces! Mallee is a hard wood to work with but it's worth the effort. It has a really nice eucalyptus fragrance while working with it and the figuring is just beautiful. |

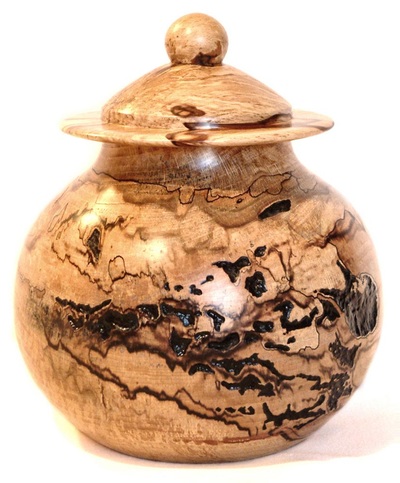
Spalted Beech 'Cookie Jar' Lidded Vessel With Ebonised Detail
|
Spalted Beech 'Cookie Jar' Lidded Vessel With Ebonised Detail
As I have mentioned previously, I like heavily spalted timber and the big block I turned this from certainly was. Heavy spalting can mean it's sometimes a little too heavy to get a good uniform finish even if you know a few tricks that usually work but that just means you can get creative.
The areas I have ebonised were too far gone to recover (I know, I tried) so I carved them out with a carbide burr, stabilised them and ebonised them. The thought of giving up on a piece of wood with such interesting figuring never crossed my mind and as I only carved the areas that the spalting had created, it fits with the natural shapes in the wood so it still looks natural. I'm a sucker for big chunks of wood but when they are spalted as well, I have to have them. This was the last big piece my timber supplier had left when I went there. Even as a block, you could clearly see that it would be a gamble to get it and I think most people didn't want to risk buying something they might not be able to turn. I just saw it, said 'aha, mine' and bought it! |

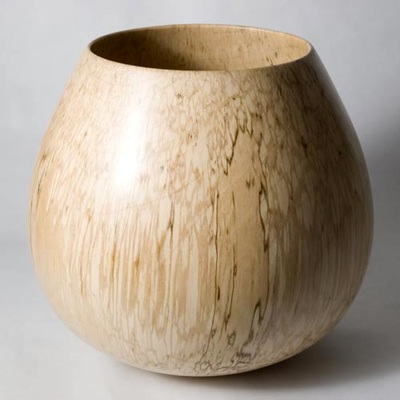
Spalted Sycamore Deep Vessel
|
Spalted Sycamore Deep Vessel
This deep vessel has some of the most intricate spalting I have ever seen in a piece of spalted sycamore. As I have mentioned before, spalted sycamore is usually more subtle than other types of spalted timber but no less beautiful, just a little less 'in your face'.
I really wanted to keep the overall form and finish if this vessel very simple and just let the figuring be the entire focus of the piece. I finished it with black bison paste wax. After polishing, I gently cut the gloss finish back to an even, soft satin finish. For most of my larger pieces, this is my preferred finish as it's good for the wood, easy to maintain and it feels nice. In fact, I have been told by many customers that items I have finished using this technique are very 'strokeable' and tactile. What is great as well is that unlike a thick, gloss coat of wax, this finish doesn't show fingerprints so go on, stroke away! I also think it looks better for much longer than the vast majority of other finishes. |
|
|
Turning Projects
I'm going to keep this section simple..... well at least for the moment! I'm just going to show you in slideshow format with annotations how I work through a turning project. In the future, I plan on doing some videos which I am determined to make a bit more entertaining and fun to watch that your average turning tutorial video. Keep an eye out for that.
Rather than trying to show you each and every step in mind-numbing detail, I'm aiming to give you a good idea how I do things and whether you are just curious how it's done, thinking of trying it yourself or even a turning veteran, I hope you find this section interesting and useful.
I've started you off with one of the biggest bowls I've turned and I'll be adding a mix of other projects soon.
Click the play button in the top left of the slideshow screen and if you miss something, click it again to pause and go back or forward with the arrows in the top right.
Woodturning Gear
I started turning with a Record DML-24X lathe, a cheap set of turning tools from Screwfix, a pair of trestles from Aldi to put the lathe on and a hand cranked grinder. I didn't even have a shed to work in. I set everything up under a pop-up gazebo and turned in the back yard! When the weather got bad in the winter, I turned in the kitchen in between meals.
As my love of turning grew, so did my collection of tools so I soon got a decent but modest workshop and I filled it with everything I needed. I got a Teknatool Nova DVR lathe (now sold as a Record DVR in the UK) which is compact but a beast when you need it to be. I also discovered that I love turning hollow vessels and natural edge pieces above all other types of turning which can be the most challenging things to turn. Hollowing tools are also some of the most expensive turning tools to buy but if you are handy with tools, you can make them for peanuts.
I am a totally self-taught, left handed turner which makes me a fairly rare breed as most people are taught to turn right handed irrespective of their preference so I have a few extra issues to overcome which I have. Lathes are right handed tools and most hollowing tools are designed for right handed turning. If you've never thought about this, I'm not surprised. I didn't until the turning bug had already bit me.
Now you know how I started out, let's get on with the gear. I'm going to cover good gear and then only stuff I personally use and recommend including my hand made tools (not for sale before you ask!). I will provide links to the exact item I own where possible. Where that isn't possible, I will recommend only the closest possible equivalent that I would personally buy in place of the actual item I bought. They will all be vendors I have used and trust (or vendors I know are generally trusted if outside the UK). Any links that go to Amazon are affiliate links and I will get a small commission from Amazon at no expense to you if you decide to buy something. Where possible, I will include links for you to sellers in the UK, USA and Canada but some gear just isn't available in all countries as I'm sure you're already aware. I'll do my best though.
Lathes
There are lots of lathes in all different shapes, sizes and price brackets. What you want to do and how much you can afford is how you should decide. No point in buying a huge, expensive bowl turning lathe if you only do pens, is there? Just get the best you can afford whether it's new or second hand. Cast iron beats steel construction and variable speed beats a belt and pulley speed change system in my opinion.
Here are the two I own plus the one that got me interested in turning wood, metal and anything else that I can fit in a chuck.
Here are the two I own plus the one that got me interested in turning wood, metal and anything else that I can fit in a chuck.
Record DML-24X
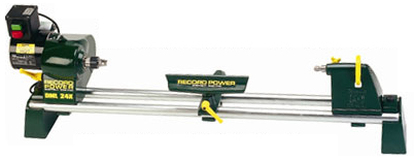 Record DML-24X
My first lathe. Simple and effective. Cast iron construction with thick walled steel bed bars. 8 inch maximum diameter capacity and 24 inches between centres. Speed is changed by means of belt and pulley. If you don't have a workshop and space is at a premium, this can be stripped down after use into its component parts in about five minutes.
For me, this only had three downsides but bear in mind that they only apply to my style of turning and none of these are faults.
This is a great lathe and leagues ahead of the pressed steel junk you might be tempted to buy in a large well-known DIY chain. I still have mine and I'm saving it for when I get to Scotland and have the room to set it up as a dedicated spindle turning lathe. I can't find a place that sells this lathe anymore so the link I've added below is for the Record DML36SH which is the big brother to this one and has longer solid bed bars and a swivel head. I've also added links to the outboard bowl turning attachment and the leg stand. These are UK only I'm afraid.
For me, this only had three downsides but bear in mind that they only apply to my style of turning and none of these are faults.
- I quickly found that an 8 inch maximum diameter capacity wasn't enough for me. I needed more like double that.
- Belt and pulley speed changing was fine but sometimes I just wanted an in-between speed and it wasn't there.
- As the bed bars aren't solid, they had a tendency to flex and bounce while roughing out larger and heavier work.
This is a great lathe and leagues ahead of the pressed steel junk you might be tempted to buy in a large well-known DIY chain. I still have mine and I'm saving it for when I get to Scotland and have the room to set it up as a dedicated spindle turning lathe. I can't find a place that sells this lathe anymore so the link I've added below is for the Record DML36SH which is the big brother to this one and has longer solid bed bars and a swivel head. I've also added links to the outboard bowl turning attachment and the leg stand. These are UK only I'm afraid.
 |
 |
 |
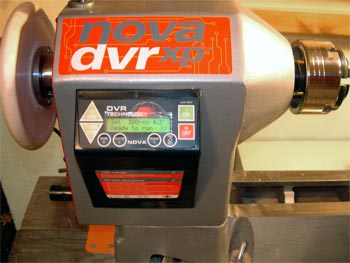
Teknatool Nova DVR XP
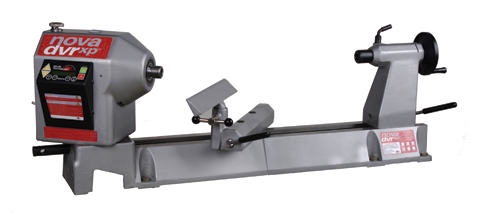 Teknatool Nova DVR XP
My baby! The most advanced woodturning lathe on the planet. Not the biggest, not the most expensive but one of the best without question. In the UK, it's now known as the Record Power Nova DVR XP complete with Records trademark green and yellow livery, it has full cast iron construction, 2 horsepower DVR motor, rotatable headstock, 1 1/4" x 8tpi spindle thread, spindle lock with built in 24 stop indexing, 16 inches maximum diameter over the bed, 30 inches maximum diameter away from the bed, 24 inches between centres but extra bed sections can be bolted on to make it any length.
I have yet to attempt anything that this lathe can't handle with ease. As a left handed turner, being able to run this in reverse and swing the head away from the bed and use the outrigger toolrest has been a massive boon for me. I've even had this set up as an engineering lathe by fitting a milling table to it. Yep, it handled turning steel just fine!
The variable speed goes from 100rpm to 3500rpm in 5rpm steps or you can set your preferred set of speeds for a particular project.
I've really tried to think of anything negative I can mention but nothing comes to mind. Nope, nothing at all.
Supernova 2 Chuck
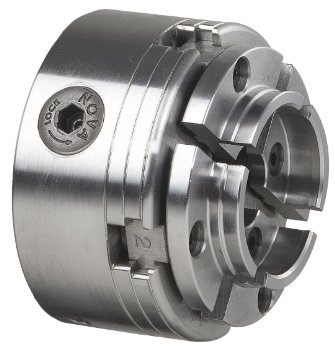 Supernova 2 Chuck
Also from Teknatool, the Supernova 2 chuck a very solid and dependable addition to any woodturning lathe. Perhaps a little overkill on small tabletop lathes but brilliant on anything larger. There is a comprehensive range of chuck jaw sets available from 1 inch diameter dovetail jaws right up to cole jaws for finishing work.
It comes with the 2 inch standard dovetail jaws, the chuck key and a stout, aggressively threaded woodworm screw which is used in place of a traditional faceplate. It's a surprisingly strong and effective method for attaching faceplate work and I've had no issues with it holding bowl blanks right up to 12 inches. A faceplate ring that fits the standard 2 inch jaws can be used for larger diameter, heavy and/or out of balance work.
You may need a thread adapter to fit this (or any chuck) to your lathe so check your lathes thread size and pitch before ordering. Get a good one. Some cheap adapters aren't perfectly machined and may need a little sanding or filing on the ends to allow the chuck to run perfectly true. I could do a quick 'how-to' showing exactly what I mean if it is a widespread problem but it might have just been the one I had. It is a very easy fix however.
 |
 |
 |
Myford Super 7
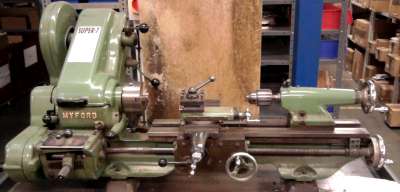 Myford Super 7
This is where it all began. Long story short, I always fancied having a go on the lathe at work and after constantly asking, I finally got the opportunity and although it was a basic job of parting off plastic collars from emergency switch cases, I was hooked. Two days later, I bought my Record lathe and the rest is history.
This is the actual lathe where I used to work and I wish I could have bought it when the place closed down but as it was 3 phase and out of my budget, it wasn't a practical option.
I plan on buying a Myford in the future once I have a workshop big enough and although I can turn metal on my Nova DVR, a proper engineering lathe is more convenient and I would like the option to cut machine threads when I need to. I could just get a modern engineering lathe but I doubt it would be as well built as an old Myford.
UPDATE: It just so happens that I now own a Myford! Stay tuned for the rebuild which will be on my projects page soon.
|
|
Chisels, Hollowing Tools & Keeping Them Sharp
I started with a basic set of turning chisels from Screwfix which they don't sell anymore but in spite of the fact that I have (on numerous occasions) spent more on a single chisel than I did for that entire set, I still use them on pretty much every single thing I turn. What I am saying is very simple. A good tool is a useful tool.
I've made a hollowing tool from a piece of scrap wood, a steel reinforcing bar from a large cable reel and a broken drill bit. It works, it was free. I also have some of the biggest, baddest hollowing tools you can buy but they can't do what my cobbled together from scrap hollowing tool can do. It's not that the one I made is somehow better than bought ones but I personally find that I use it a lot so it has a value to me. I also have made a more advanced hollowing tool which is great but I still reach for 'Old Scrappy' when I know it will do the job better.
Whatever tool you get, new or old, cryo treated HSS or some random chunk of steel you found in the street, the most important thing is that it's sharp, very sharp. In fact, so sharp that you are a bit scared of it. If you can't sharpen your tools and keep them sharp, you will never get far with woodturning and you are far more likely to get injured by a blunt tool than a sharp one in this game because you'll get impatient and frustrated, try to force the tool to cut something it can't, it will dig in and that's when things get dangerous.
I'm mentioning sharpening because even though the title for this section starts with chisels and hollowing tools, the first tools I'm going to mention are those that sharpen them. I'm sure you can understand why based on what I mentioned above.
Record RPBG8 - 8 Inch Bench Grinder
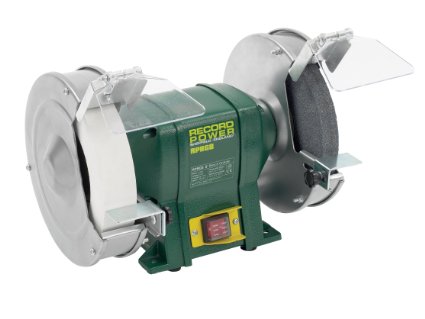 Record RPBG8 - 8 Inch Bench Grinder
A 25mm wide rough and fast cutting stone and a 40mm wide fine white wheel is a great combination to take any cutting tool from totally edgeless to a fine cutting edge very quickly. As with all high speed grinding tools, you don't want to blue the edge and ruin the temper so lots of fast and light grinds is the order of the day and it's a good idea to have a small container with water in to quench the tool if it does start to get too hot.
This grinder is the best compromise between price and quality I could find based on similar specifications and is a brand I trust to make decent tools. Some people have reported having issues but mine has been perfect since I bought it which is why I'm still happy to recommend it.
Also, I would always recommend getting an 8 inch grinder over a 6 inch or even smaller because an 8 inch wheel doesn't hollow grind your tools as much as the smaller grinders do.
A very hollow grind means the cutting edge has less support and seems to chip and get blunt faster which in turn means you grind your tools away faster and a very hollow ground tool can be quite unpredictable and twitchy in use due to the lack of good bevel support.
 |
 |
 |
|
Record RPBG8 Grinder
|
Rikon 8 Inch Grinder
|
Rikon 8 Inch Grinder
|
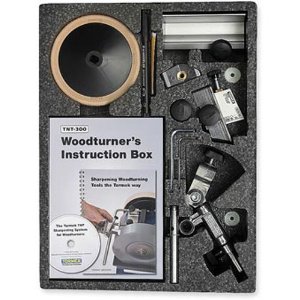
Tormek T4 & Tormek TNT-708 Turners Toolkit
 Tormek T-4
If you are a beginner or on a fairly tight budget, the Record grinder above is all you need perhaps with the addition of a proper gouge grinding jig and to be honest, I use my Record a lot of the time while turning. It takes seconds to put a fresh edge back on and that means I can get back to turning faster which is the whole point, right?
Having said that, there are times when only the edge from a Tormek will do and that's why it's here. Very soft or heavily spalted wood cuts far more cleanly with a Tormek sharpened tool than it does to a dry ground 'wire edge' in my experience.
The long and short of it is this, if you want a flawless, mirror polished, insanely razor sharp edge, get a Tormek. There are obvious copies of their products and I imagine they will work just as well but I'll keep my Tormek thanks! I actually have the T-1200 Supergrind but it's modern counterpart is the 8 inch T-4.
The T-7 which is the 10 inch version seems to be the most popular and well regarded model, it's also the only model that is fairly easy to get hold of so based on that, it's the one I'm going to link to where I can't find a good link to a T-4. Don't worry, all the different sharpening jigs new or old will fit any of the Tormek models regardless of stone diameter.
There's something oddly satisfying about putting an outrageously sharp edge on things and this isn't just for turning tools by the way, it'll sharpen kitchen knives, pocket knives, axes, hand plane blades, garden shears, scissors and basically anything with a cutting edge and there's grinding jigs for most of what I mentioned so you get an easily repeatable result. I'm sure you could buy scalpel blades and make them sharper than when they came out of the factory with this!
 |
 |

|
 Tormek TNT-708
One of the hardest parts of sharpening is finding the perfect grind to suit the tool and your specific turning style then trying to replicate it time after time. It takes years of practice to do it freehand and although I can do it with most of my turning tools, putting a good fingernail profile on a gouge totally freehand is something I have tried and failed to do over and over again. I can pick up the knack of things quite quickly but this was just one of those things that eluded me. Not to worry, Tormek to the rescue!
Their TNT-708 set of jigs is brilliant and pretty much comprehensive. Their gouge jig is a joy to use and can handle a simple grind for a spindle gouge right through to the extreme end of swept grinds like my personal favourite for bowl gouges the 'Ellsworth grind'. The best thing about this set is that once you get into a rhythm, you can sharpen your tools precisely how you like them again and again and quite quickly too.
Don't get me wrong, you pay a premium for anything with Tormek written on it but as soon as you use their gear, you know why. Original and best totally applies here.
As an additional side benefit, you can make a base to hold Tormeks tool rest and get the initial shaping done super fast on a bench grinder then refine it on the Tormek. I'm happy to do a quick 'how-to' if it might help anybody.
 |
 |
 |
Eze-Lap Diamond Grit Pocket Sharpener
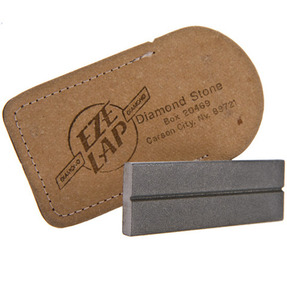 Eze-Lap Pocket Sharpener
I keep this in my pocket and use it very often while turning. It takes a few seconds to put a sharp edge back on a tool and I'm turning again. I would say that I use this 5 times or more then re-grind the edge so it does make a big difference.
Skews, gouges, scrapers, parting tools and hollowing tools all can be 'tickled up' with this and because this is flat and the tools have a hollow bevel, you are only working on the actual cutting edge and the heel of the bevel so it only takes a couple of wipes to make the tool sharp again. It uses diamond grit as the abrasive and I can tell you that it lasts. I've had mine for at least 7 years and it's still going strong.
It's not that good, is it? Yes, it really is. I have used my skew chisel for cutting a piece of 1 inch diameter aluminium rod and without re-grinding it, I used my Eze-lap to tidy the edge and it was back to work on an ebony spindle. If I'm only turning a small item, I don't even bother with grinding and just use this. don't get me wrong, this won't do instead of a proper grinding tool but it does mean you won't be grinding as much as you would be without it.
 |
 |
 |
Okay, I think you get the point. Sharp = good. Blunt = bad. Let's get on with the tools now, shall we?
Record Spindle Turning Tool Set
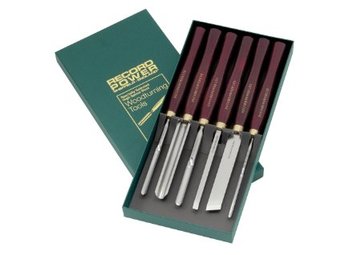 Record Spindle Tool Set
This set is what I mostly rely on for turning spindle work such as stems and finials as well as a lot of the external work on a lot of my hollow vessels. I prefer to cherry pick the exact tool I want when buying them but this set had everything I was planning on buying, I got a good deal on them and it worked out cheaper than buying each tool separately so win-win!
They are HSS steel and hold an edge very well. They feel solid but not too heavy so they are good for working on delicate and detailed parts of your work.
I would prefer to have a longer handle on the roughing gouge but that's personal preference because I need the extra length when I'm roughing big gnarly logs down which isn't what it was designed for. For jobs where more handle would be better, I have since bought a bigger roughing gouge blade and fitted it to a long, hefty handle.
The only thing I can think of that would make this very good set of tools even better would be if it included a parting tool but it's still worth every penny.
 |
 |
 |
Bowl turning tools
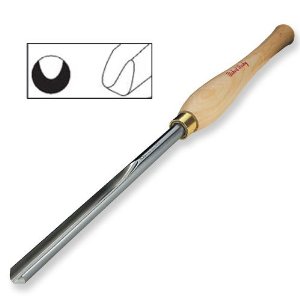 Robert Sorby Bowl Gouge
There doesn't seem to be a set of bowl turning tools on the market that I could recommend so I'm going to recommend brands I use and trust then what I would consider a good starter set and a more versatile set.
I use Robert Sorby, Hamlet, Crown, Craft Supplies own brand and Dakota tools from Rutlands. They are all good tools and although the Dakota tools are cheaper than the others, they are a great range to start with and they won't break the bank. I use the ones I have regularly but I don't feel they can take the same amount of punishment as the tools from the more expensive brands. Once you start to get into larger work with natural edges and more of the tool extending over the rest, you need to start looking at the bigger, more expensive tools. You need faith in the tool you are using so you can concentrate on what you are doing instead of worrying about whether the tool is about to snap.
With almost all bowl turning tools, especially as the tools get larger, you want the longest handle you are comfortable with. The forces involved with bowl turning are significant and the longer the handle, the more control you have.
 Robert Sorby Round Heavy Duty Bowl Scraper
For a starter set, I would suggest you start with a 3/8ths inch bowl gouge with a long handle and a pair of 1 inch bowl scrapers, one flat ended and one round ended. This 3 piece set will get you started but a skew laid flat on the toolrest comes in handy for cutting male and female dovetails to fit the bowl blank to the chuck so this might be something to consider too if you don't already have one.
A more comprehensive set that can be used for anything from a delicate little trinket bowl to a 3 foot natural edge bowl turned from a tree trunk would be as follows; the above set plus 1/4 inch, 1/2 inch, 3/4 and 1 inch bowl gouges, a pair of thick, heavy duty 1 1/2 inch wide bowl scrapers one flat, one round ended and a straight shafted hollowing tool for very deep bowls. This set is also a good for trying your hand at hollow vessels but I would strongly recommend getting a lot of turning under your belt before tackling a hollow vessel.
The links below are for the 3/8ths bowl gouge which I think is the most versatile and best bowl gouge to start with and the other tools I have mentioned are easy to find once you've clicked the link for the gouge. I put an 'Ellsworth grind' on my 3/8ths gouge and although it makes re-sharpening a little more tricky than usual, it cuts so sweetly that it's easily worth the time and effort to get it just right!
 |
 |
 |
|
|
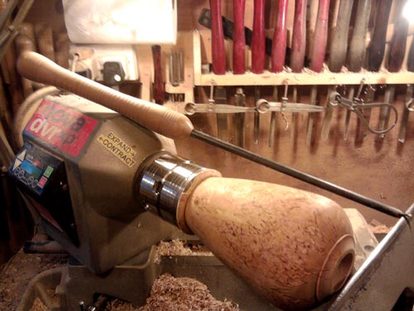
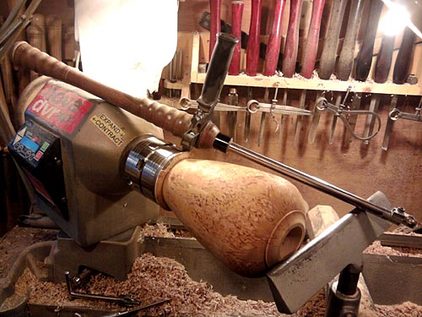
Hollowing Tools
 Putting my DIY Hollowing tool to work. I was so focused on setting my camera up that I forgot to put my safety specs back on afterwards. Doh!
I'm not going to mince words here, hollowing tools are bloody expensive. They are specialist tools and while some are great, others are over engineered for no reason I can work out other than to make them look fancy and therefore more expensive. Do they work? Yes. Do they work better than cheaper ones? No, or at least not so much better that the cost is justified.
I do know that a big part of the cost is due to hollowing tools being a relatively small niche market and small production runs in manufacturing are always far more expensive than something that's pumped out by the million so I'm not in any way criticizing the manufacturers, but don't expect that just because you coughed up for the most expensive hollowing tool that it will work flawlessly out of the box and in any situation. It won't.
A small selection is the way to go in my opinion to make sure you don't get stuck with having to design a piece based on the limitations of one tool.
I decided to make my own selection because I found that each hollowing tool I have bought has needed modifying to a greater or lesser extent so with that in mind, I figured that instead of paying a fortune for something I have to do more work on than just keeping it sharp, why not make my own and save a small fortune. Either option involves similar techniques so why not?
Here's the hollowing tools I have so I can prove to you that I am speaking from experience. I have an Exocet by Link Technology, a Hamlet Big Brother and a Robert Sorby Hollowmaster (RS230KT). I also have two hollowing tools I made, the first I have mentioned in the intro to this whole section which is made from scrap, the second is more refined but still made at no cost to me again.
So I have 5 hollowing tools at the moment, all slightly different, 2 are high end shielded cutter types, 1 is a swan necked scraper/pick type and the last 2 are scraper/pick types made by me.
For 99% of all hollow turning I do, I only use the tools I made and the following should explain why.
 Exocet By Link Technology
The Exocet by Link Technology is beautifully made and cuts certain types of wood so cleanly, far better than my pick tools but it constantly clogs, it's tricky to sharpen and the handle is too short when the shaft is fully extended. I plan on tinkering with the cutter and shield on this and if that goes well, I'm also going to make a left handed swan neck bar for it when I get the time.
 Big Brother By Hamlet
The Hamlet Big Brother has the bulk and long handle that the Exocet lacks but the shield for the cutter is a nightmare to set properly and get an even gap, it also needed to have the underside of the shield ground down to reduce the clogging. When it is working, it's great and it cuts clean and fast but I'm still planning on making the modification to the cutter that Paul Hannaby made to his. Click HERE to see what he did.
 Robert Sorby Hollowmaster
The Robert Sorby Hollowmaster can do a really good job on particular pieces. It looks like it has a really thick round shaft in most photographs but it has a 3/4" wide flat surface on the bottom so it's actually D shaped in profile.
This is good when you first start doing hollow vessels as it helps to keep the tool relatively stable but it also ensures that the tool is the right way up if you can't see the cutting tip because you are working through a small opening. The problem I have with this tool is that the width of the shaft and the radius of the swan neck make it hard to turn a hollow vessel with even a moderately small opening. Not impossible but just more difficult than it should be. It's hard to explain but you'll know what I mean if you have one.
None of this is a problem if you aren't working through a small opening but the whole idea of this tool is that it's for undercutting the area around an opening so it kind of confuses me.
I think I've worked something out though. My DIY hollowing tools work for me but they might not suit anybody else, this tool might suit the person that designed it and their style of turning but it doesn't suit everybody so it's a Marmite tool but isn't this true of lots of things in life?
I will say that it's solid and quite unlikely to fail on you if you push it to the limits. If you don't see yourself making hollow vessels with small openings then it's not a bad tool at all. If I take my (probably) unfair expectations out of the equation then I can recommend it based purely on its build quality, price point and cutting performance. This is also the only hollowing tool of the three I've bought that only needed a slight profile change to the cutting edge to make it work much better. Instead of the rounded end it comes with, I ground a more pointed, angular profile and now it cuts faster and cleaner with far less chance of catching the grain.
It's the first hollowing tool I ever bought and it's the one I learnt to hollow with. I've used it a lot and it didn't put me off hollowing but the more experienced I got, the more I noticed that I needed something a little different for what I do. Different strokes for different folks.
This is by far the cheapest hollowing tool of the three I have shown you and it's the only one I've put links for. If you're just getting into hollowing then it's a good place to start. If you find that you like hollowing but want something different, consider making your own, it's not that difficult and you can spend the money you'll save on some nice timber and perhaps a few other useful turning tools and gadgets!
 |
 |
 |
|
Robert Sorby Hollowmaster
|
Robert Sorby Hollowmaster
|
Robert Sorby Hollowmaster
|
My DIY Hollowing tools
 Basic DIY Hollowing Tool
The first hollowing tool I made was born out of necessity. I needed a thin, straight tool to work on a tall, narrow, vessel with a small opening (similar in shape to a bowling pin). Most of the hollowing consisted of fairly straight plunging cuts but a little undercutting was required as well. I had a look round and gathered a few pieces to see what I could make. I had a nondescript but solid spindle blank that would do for a tool handle and a length of 10mm diameter steel rod from a huge cable reel, a broken 3mm drill bit and a small, short screw.
I cut the threads off either end of the steel rod and mounted it in the lathe. I then drilled a 3 mm hole in one end, another at about 45 degrees which met the first hole inside the rod but I kept drilling until it was almost out the other side of the rod. Next was another hole through the top of the rod where the other two meet. I tapped the last hole to suit the screw and used a combination of grinding, filing and sanding to shape the end of the rod to a bullet point.
I drilled and turned the handle then used epoxy to fasten the rod to the handle. While that was curing, I ground a flat on the top of the drill bit then a rounded end like a fingernail and I removed what was left of the flutes from the other end.
Once the epoxy had cured, I test fitted the freshly ground pick in each of the two holes then tried holding it in place with the screw. It was held solidly in either hole and it worked really well for the vessel I made it for and countless others since. As well as this design being essentially two tools in one, it also works with the lathe in reverse which is great for me as I'm a left handed turner!
*I will be replacing the low quality pictures of my hollowing tools with much better ones soon*
 Advanced DIY Hollowing Tool
As I found that hollow vessels were going to be something I wanted to make more and more, I started working on larger pieces and although my first hollowing tool was still working perfectly, I decided to make a beefier version with a few extra tweaks. A side handle, a larger cutting tip, an articulated head and a thicker shaft were what I wanted so that's what I made.
The handle is the other half of the same boring spindle blank I made the first tool handle from but this time the steel shaft is from 5/8ths diameter rod. The side handle is from a cheap hammer drill, the ferrule is a section of tube from a clothes rail and although I have the cutter from the Hamlet Big Brother fitted in the picture, I made a short articulated head with a 5mm cutter (broken HSS drill bit again!) that fits where the Hamlet cutter is. This tool did require a bit of work with an angle grinder to cut the flats on the end of the main shaft and on the articulated head but you could do that with a hacksaw if you have the patience!
I'll be adding close up shots so you can see in more detail how its made.
I do plan on making another tool but with a swan neck and the handle will be cut from a nice old piece of walnut. The walnut was given to me by a friend that used to make handles for fine woodworking tools at Marples many years ago. I'm also going to make a small set of hollowing tools for miniature work so I'll make sure I get shots of all the builds as well.
|
|
Turning Accessories
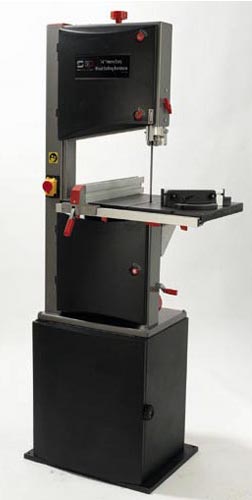 SIP 14" Bandsaw
There are a lot of extra tools and accessories for woodturning that range from what I would consider essential all the way through to things that are just occasionally handy. As always, if I haven't used them personally, I'm not going to recommend them because I'm not comfortable telling you something is great if I don't honestly know it is.
Having said that, I also know that a lot of machinery these days is all made in the same place by the same factory and just has different paint, labels and other small and insignificant differences like the shape of knobs and buttons to suit the company that puts their brand name on it so if I'm confident that the only differences are purely cosmetic and the machine underneath is the same as mine, I'll link to it. Fair enough? I mean, a neon pink bandsaw with lime green knobs will still cut wood just the same, won't it?
I can't go into too much detail but I used to work for a company that made concert speakers for a very famous American musical instrument company. We made them to their specifications and design then put their brand name on them. Apart from a few details that didn't change the sound or how the speakers worked, we made almost the same speakers for less well known brands that sold for an awful lot less. This sort of thing happens far more often than you might think.
First of all, unless you always buy round bowl blanks or only ever do spindle work, you're going to need a bandsaw. A jigsaw might be okay at first but trust me, a bandsaw makes a massive difference. I have a SIP 14" bandsaw with a depth capacity of 8". That seems like it would easily be enough but no, even with this beast, I've still on occasion had to resort to whipping the chainsaw out. For any normal person, an 8" capacity bandsaw will be more than adequate. It's not just the thickness you can cut that's important, bandsaws this size have motors that can easily handle cutting hardwood all the time and can also run the bigger and more aggressive blades which cut faster.
I had a Burgess 3 wheeled benchtop bandsaw and it couldn't handle a 2" thick yew bowl blank. It stalled as soon as the blade was fully into the wood and I ended up cutting the corners of the blank off with a handsaw so it was octagonal.
I struggled on for a while, cutting most of my wood with a Japanese pullsaw but it seemed stupid to sometimes be spending up to an hour struggling to hack through a single blank so I gave in and bought the exact bandsaw you see on the right and I haven't regretted buying it for a single second.
As well as the lathe itself and the actual woodturning hand tools, this is utterly essential if you are serious about turning but don't forget, you can use this for far more than just cutting spindle and bowl blanks. This is a very useful tool if you do any form of woodwork whatsoever.
 |
 |
 |
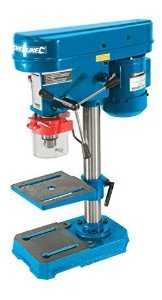 Pillar Drill
Another tool I couldn't do without is a pillar drill or drill press if you prefer. I started with a cheap, small one from B&Q which I would still be happily using today if I hadn't got a fantastic vintage Startrite Mercury Mk.II from where I used to work. The Startrite has about twice the throat (the distance from the pillar to the drill bit) and also about 5 inches of travel when drilling with the depth stops fully backed off so drilling pen blanks or long cord pull blanks is a breeze and although I could do them on my lathe, using this is far quicker.
The image to the right is the same pillar drill I got from B&Q. Mine was green and labelled as Ferm but as I mention above with regard to my bandsaw, no matter which brand name is on the sticker or what colour its been painted, this particular model comes out of the same factory in China. They are cheap and fairly crudely constructed but they are functional and I never had any problems with mine. As I said, if I hadn't got the Startrite, I'd still be using this one now. Not all turners are going to use a pillar drill as much as I do so that's why I suggest getting this hobbyist level one over the more heavy duty drills. It's cheap, it doesn't take up too much space and it does the job. It's got 5 speeds too which is nice to see on such a cheap, little machine.
I would also recommend buying a mains or cordless drill. Not specifically for drilling but for sanding bowls and hollow vessels. I would probably lean more towards the mains drill if you turn a lot to save you having to keep swapping and charging batteries.
 |
 |
 |
 Centre Finder
Measuring and marking equipment is an area you can't overlook. I use steel rules, carpenters squares, engineers squares, centre finders, half a dozen types of callipers, two sizes of compass, depth gauges, digital verniers and that's just for starters. Never mind the pencils, punches and scribes. You don't need that much stuff.
If you do spindle or bowl turning, get a good centre finder, a 12" steel rule and a pencil. That'll get you started. The centre finder to the right is the one I use almost all the time. It works for spindle blanks and bowl blanks. It can find the centre on round or square blanks in both cases and is good up to 8 inches diameter but you can go as large as you want by using it then just extending the lines with a pencil and rule.
All the other gear I've mentioned is useful but the centre finder will make your life much easier right from the start.
I would suggest that if you start working on larger pieces then consider getting wall thickness callipers. Robert Sorby make the best ones for this purpose and that's what I use. One large figure 8 for bowls and the large hollow vessel calliper.
 |
 |
 |
What else? Well there isn't a short answer to that. It all depends on how you develop as a turner. There are so many facets and niches to turning that I could spend the rest of my life trying to list everything that you might find useful but I'm hoping that by this point you are already finding out what you think is the best for your style of turning. When I've got time, I'll go over sanding and finishing and anything else I think is useful for fellow woodturners such as safety gear but in the meantime I want to get away from the computer and get some turning done!
I'll be back!
I'll be back!
How I Work
I never intentionally copy any other woodturner, repeat a piece, take commissions or make anything to order. Unless it's unavoidable, I don't work to templates, drawings, plans or time limits. I normally go into my workshop, look at the timber I have and then decide what to make. I design as I am turning and I frequently stop and look at the wood to see what I am uncovering as I cut. If something unexpected and beautiful appears in the wood and my original design will mean that I'll end up losing it by cutting it off, I'll change the design if at all possible. I've been an artistic person for as long as I can remember so working this way just feels right and natural to me and I think that if you want to do something that hasn't been done before, that's how to do it. Work with your raw materials, don't just stick to the plan because it says so. In fact, throw the plans away & don't worry about them, be more Zen-like and just go with the flow.
I spent most of my 9 to 5 working life making things a specific way with specific parts within a specific time limit and although that was totally what was needed in that situation to do the job properly, creativity and freedom rarely figured into the equation, now it takes priority.
As I mentioned, I don't copy other turners work but I do greatly admire the work of David Ellsworth, Cindy Drozda, Binh Pho, Marilyn Campbell and the collaborative work of Liz and Mick O'Donnell. They each focus on very different styles and disciplines of turning but they are all masters at what they do.
I'm inspired by shapes and forms I see in nature as well as in classical architecture and design. I also like both art deco and art nouveau styles. It's nice to not be tied to one particular style and although some may think that means I'm unfocused, I don't see it that way. I love music and one minute I'm listening to Ella Fitzgerald, the next I've got Skrillex bouncing sawdust around in my workshop. Variety is the spice of life and I like mine extra spicy!
|
|
|
Amazon Affiliate Disclosure
PJN Woodturning is a participant in the Amazon Services LLC Associates Program and Amazon.com.ca, Inc. Associates Program, an affiliate advertising program designed to provide a means for sites to earn advertising fees by advertising and linking to Amazon.com and Amazon.ca.
PJN Woodturning is also a participant in the Amazon EU Associates Programme, an affiliate advertising programme designed to provide a means for sites to earn advertising fees by advertising and linking to: Amazon.co.uk/Local.Amazon.co.uk/Amazon.de/Amazon.fr/Amazon.it/Amazon.es.
You can read our full USA or EU Operating Agreement here: (USA) or (EU)
