
 |
Projects - Some Of The Things I Make & Do |
|
before we get started...
This page is to show some of the projects I have made over the last few years and I hope that they might inspire you to make some of your own. I will be adding them plus anything new as and when I get time. I make all sorts of stuff, mostly practical but also some more unusual things. Some because I can't afford or justify the cost of buying the proper version if I'm being honest, others just because I wanted to see if I could. I have photographed a lot of the things I have made as I made them but it was never my intention to do a comprehensive 'How To' at the time so this won't be a full on step-by-step instructional page but you should be able to fill in the gaps with a search on the net for anything I have missed.
If you want a little more background info on my projects in general or want to read my thoughts on workshop safety, you'll find that just under the projects list below.
Okay, let's make something!
If you want a little more background info on my projects in general or want to read my thoughts on workshop safety, you'll find that just under the projects list below.
Okay, let's make something!
|
Bird Boxes
Why not give nature a home? This is a great starter project that can be done with basic hand tools and you will end up with something that gives you a warm, fuzzy feeling when you see it being used!
This is also a good way to get kids interested in nature and woodwork (with supervision, of course). |

|
Gold!I love gold, not the Mr. T diamond studded bling gold but the raw stuff. I really like making the gear to find it as well. Stream sluices, recirculating high bankers, miller tables and classifiers, I've built the lot but here's a little section on why I made everything I did. Consider it a sort of 'primer' as I will be adding all the builds soon.
|
|
Drop Riffle Gold Sluice
This is the easiest sluice to build if you have the right tools. Five pieces of wood, four of which aren't much more than planks cut to length, it's the base that takes a bit more to do. To help out, I've provided you with a full scale template to get the pattern right which is taken from the template I made to make mine.
|
|
Art Cabinet
Although I made mine to hold my art gear, this cabinet could be used for lots of things. Made mostly out of scrap and off-cuts, the cost was minimal but it required some creative thinking to get around some of the problems and disguise the humble budget of the build.
I did get a chance to hand-carve during the build which was nice! |
safety Disclaimer & Background Information
I am comfortable with very sharp tools, very powerful tools and potentially dangerous tools. I understand the risks involved and through years of experience, I know what can go wrong. If something doesn't feel safe, don't do it. Always wear appropriate clothing and safety gear especially safety glasses. I take no responsibility for any injury you might get from making what I show on this page. Common sense is always your best guide. I'm not saying don't do it nor am I trying to scare you, I'm just saying think first and be safe.
Over the years, I have bought and accumulated quite a few specialist tools and in some cases where there isn't commercially available equipment, I've made what I needed to get a job done. My late Grandfather was a master builder and carpenter and I have now inherited his tools as well as having my own from when I did electronics and engineering for a living so I'm lucky that I have most bases covered. Having said that, there's usually a way around having the right tool for the job. A pillar drill is great but a normal corded or cordless drill will often do just as a jigsaw will usually work in place of a bandsaw.
I usually work on a few different projects at a time so if I'm waiting for glue to dry or trying to figure out how to do the next part, I can get on with something else instead of just waiting. This often means that my workshop looks like a tornado has hit it! I also don't like taking my DSLRs into my shed during a project as I know they will get damaged so I have only used my old smartphone up to now which is why some pictures aren't brilliant. From now on, I will use my compact Nikon whenever possible as I can keep that out of harms way.
Sanding Table For A Lathe (Mk.I)
Something
I use very often is a lathe (yes, I know. A woodturner uses a lathe,
well that's a surprise, right?) but I don't always use it AS a lathe.
It's essentially a huge motor so with the right attachments, it can be
used to do any job that involves spinning stuff. Drilling, sanding,
sawing, grinding, polishing, tapping threads, etc. etc. One of my most
used attachments is a big sanding disc and table. It's SOOOOO useful
(you'll see it in a lot of the pictures) and that's why the two versions
I have made are the first two projects on this page. If you have a
lathe, you really need this in your life!
I truly believe that if you are a lathe owner, this is one of the most useful non-standard extras you can have. In days gone by, lathes had all sorts of tools which could be bought as an aftermarket add-on that utilised the lathes motor. Shopsmith do still make add-ons for their lathe but not everybody has a Shopsmith lathe. I have a Nova DVR which I love and it's a great lathe for woodturning but with a little ingenuity, it can also be looked at as a variable speed, reversible 2.5 horsepower heavy duty motor for whatever you can attach to it.
Getting back to the table, I wanted to try my hand at doing a bit of segmented turning and I knew I would need to put very flat edges on the segments and at just the right angle for it all to fit together tightly so I looked at what I had to do the job. Long story short, despite having lots of ways of cutting the pieces, none seemed like a good idea either the risk of injury was too high with small pieces of wood or the wood might get damaged and I only just about had enough for the project so I decided to cut the pieces just oversize and sand them down to the exact size. This meant I had to make a table and corresponding sanding disc but I thought 'it'll be worth it and I might use it in the future'. Well, it was worth it and I have used it A LOT since! Yes, you can buy a similar thing and they do work well but mine cost nothing and it's 10" in diameter which would be a bit more expensive than you might think. Also, I can run mine at 100rpm to 3500rpm or anywhere in-between AND in reverse so there!!!
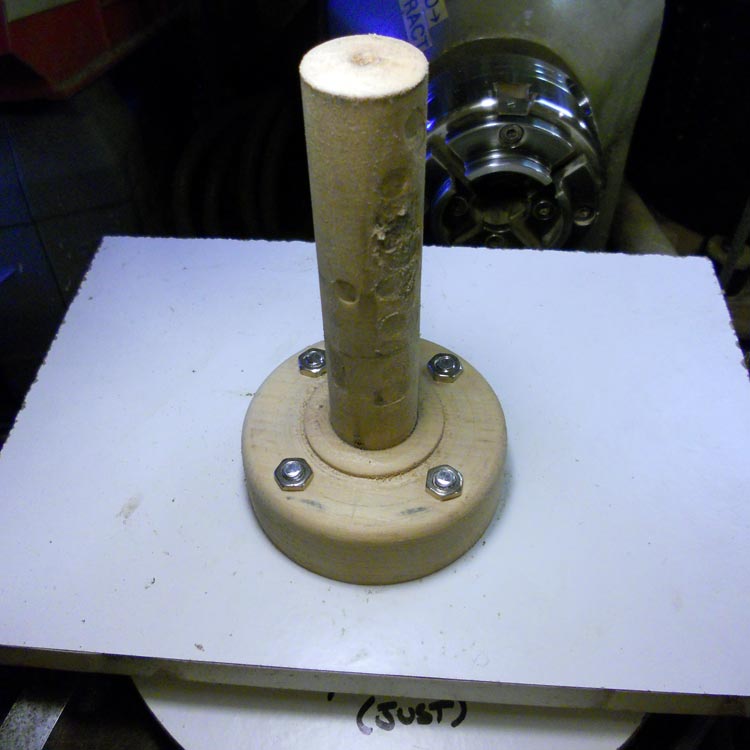
This is the first one I made and apart from the bolts, it's all constructed from wood which wasn't the best idea but it's what I had to hand. It worked perfectly well and I have used it for years. The only real weak point was the main post which fits where the toolrest post usually goes in the banjo. I only used birch as I wasn't sure if it would work and it did but it was far too soft so the end of the bolt to hold it in place made a big dent every time I needed to reposition the table. I knew I should have used oak or something more resilient but I already had a length of birch rough turned. Not to worry though, It did a great job and the segmented bowl came out just as I had hoped with everything fitting together perfectly so lesson learnt, project finished and theory tested.
The top is an offcut of melamine faced chipboard which is bolted to a 1 inch thick, 4 inch diameter disc of birch. This disc has a 1 inch hole drilled through it with the turned birch post superglued into it. Due to the forces involved with a big disc sander, I intentionally set the post close to the edge of the table which would be nearest to the disc to give better support.
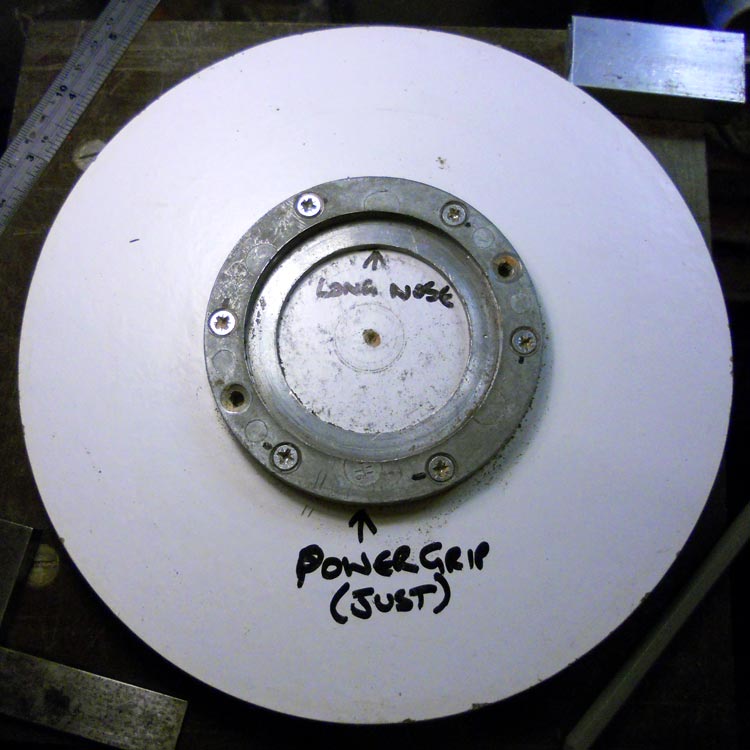
The sanding disc is made from another offcut of melamine faced chipboard cut roughly round on the bandsaw and trued up on the lathe after it was screwed to a faceplate so it runs without any wobble. I then applied double sided tape on the face of the disc and stuck 80 grit aluminium oxide sandpaper to the tape. I cut the excess sandpaper from around the outside of the disc with a knife and that was that, done.
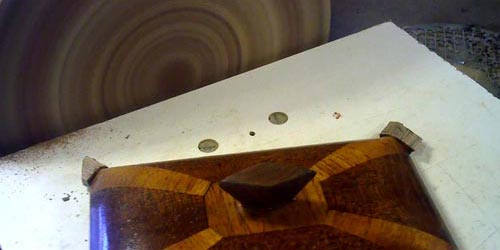
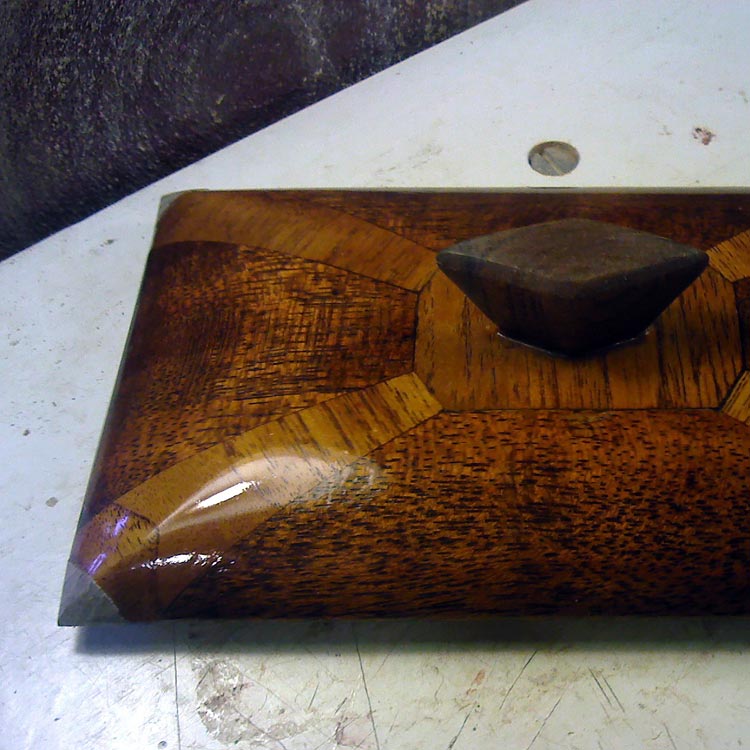
In the picture, I'm restoring an old handmade box lid. The corners had all snapped off due to the way the grain is running (the same had also happened to the knob but I'd already fixed that) and although the colour of the pieces I've glued on isn't the same now, it will be in a few years. I used the sanding table to put a flat on the broken corners, as well as the small pieces I glued on and then I took the pieces down to the right shape with it as well (I'd already made a start on the top left corner). Quite useful for some scrap stuff that most people would throw away, isn't it?
Like I said, I used this one for years but I knew that I'd have to make a Mk.II and I now had a few ideas on how to make it even more useful and sturdy. Well, Mk.II is finished and it's a great table but I still use the original sanding disc as it's fine just the way it is. I got that one right first time it would seem. Click on the pictures below for a closer look.
I truly believe that if you are a lathe owner, this is one of the most useful non-standard extras you can have. In days gone by, lathes had all sorts of tools which could be bought as an aftermarket add-on that utilised the lathes motor. Shopsmith do still make add-ons for their lathe but not everybody has a Shopsmith lathe. I have a Nova DVR which I love and it's a great lathe for woodturning but with a little ingenuity, it can also be looked at as a variable speed, reversible 2.5 horsepower heavy duty motor for whatever you can attach to it.
Getting back to the table, I wanted to try my hand at doing a bit of segmented turning and I knew I would need to put very flat edges on the segments and at just the right angle for it all to fit together tightly so I looked at what I had to do the job. Long story short, despite having lots of ways of cutting the pieces, none seemed like a good idea either the risk of injury was too high with small pieces of wood or the wood might get damaged and I only just about had enough for the project so I decided to cut the pieces just oversize and sand them down to the exact size. This meant I had to make a table and corresponding sanding disc but I thought 'it'll be worth it and I might use it in the future'. Well, it was worth it and I have used it A LOT since! Yes, you can buy a similar thing and they do work well but mine cost nothing and it's 10" in diameter which would be a bit more expensive than you might think. Also, I can run mine at 100rpm to 3500rpm or anywhere in-between AND in reverse so there!!!
This is the first one I made and apart from the bolts, it's all constructed from wood which wasn't the best idea but it's what I had to hand. It worked perfectly well and I have used it for years. The only real weak point was the main post which fits where the toolrest post usually goes in the banjo. I only used birch as I wasn't sure if it would work and it did but it was far too soft so the end of the bolt to hold it in place made a big dent every time I needed to reposition the table. I knew I should have used oak or something more resilient but I already had a length of birch rough turned. Not to worry though, It did a great job and the segmented bowl came out just as I had hoped with everything fitting together perfectly so lesson learnt, project finished and theory tested.
The top is an offcut of melamine faced chipboard which is bolted to a 1 inch thick, 4 inch diameter disc of birch. This disc has a 1 inch hole drilled through it with the turned birch post superglued into it. Due to the forces involved with a big disc sander, I intentionally set the post close to the edge of the table which would be nearest to the disc to give better support.
The sanding disc is made from another offcut of melamine faced chipboard cut roughly round on the bandsaw and trued up on the lathe after it was screwed to a faceplate so it runs without any wobble. I then applied double sided tape on the face of the disc and stuck 80 grit aluminium oxide sandpaper to the tape. I cut the excess sandpaper from around the outside of the disc with a knife and that was that, done.
In the picture, I'm restoring an old handmade box lid. The corners had all snapped off due to the way the grain is running (the same had also happened to the knob but I'd already fixed that) and although the colour of the pieces I've glued on isn't the same now, it will be in a few years. I used the sanding table to put a flat on the broken corners, as well as the small pieces I glued on and then I took the pieces down to the right shape with it as well (I'd already made a start on the top left corner). Quite useful for some scrap stuff that most people would throw away, isn't it?
Like I said, I used this one for years but I knew that I'd have to make a Mk.II and I now had a few ideas on how to make it even more useful and sturdy. Well, Mk.II is finished and it's a great table but I still use the original sanding disc as it's fine just the way it is. I got that one right first time it would seem. Click on the pictures below for a closer look.


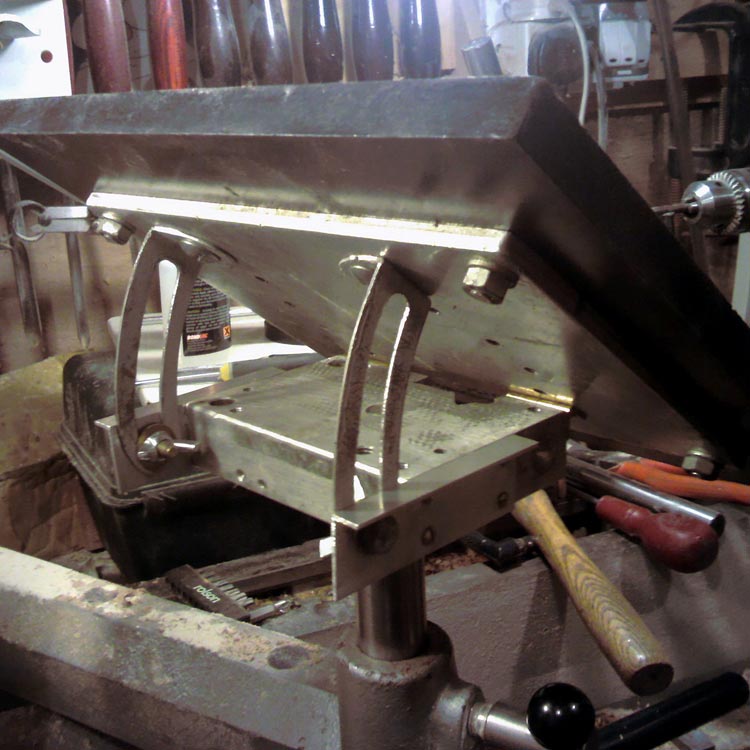
Sanding Table For A Lathe (Mk.II)

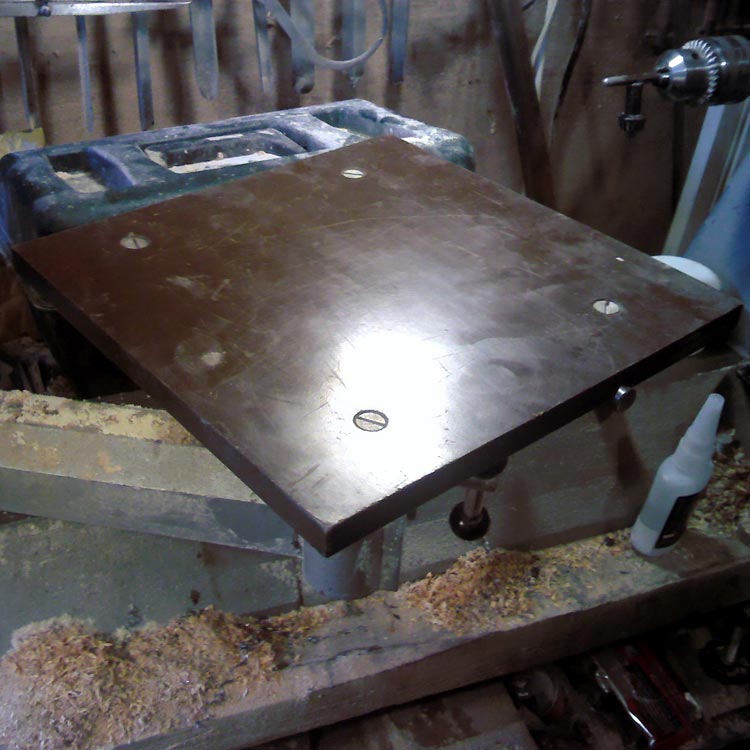
The first table was great for the occasional job here and there but I found myself doing more and more projects that used the table and I needed something far more robust and versatile. My workshop is quite small and this small table is often the only work surface available as everywhere else is full of tools, wood, or parts that are clamped up and waiting for glue to cure.
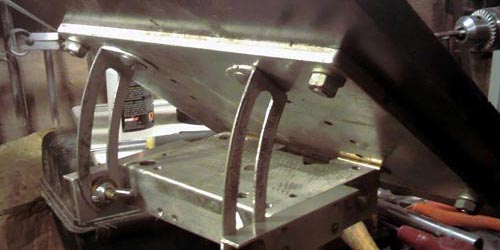
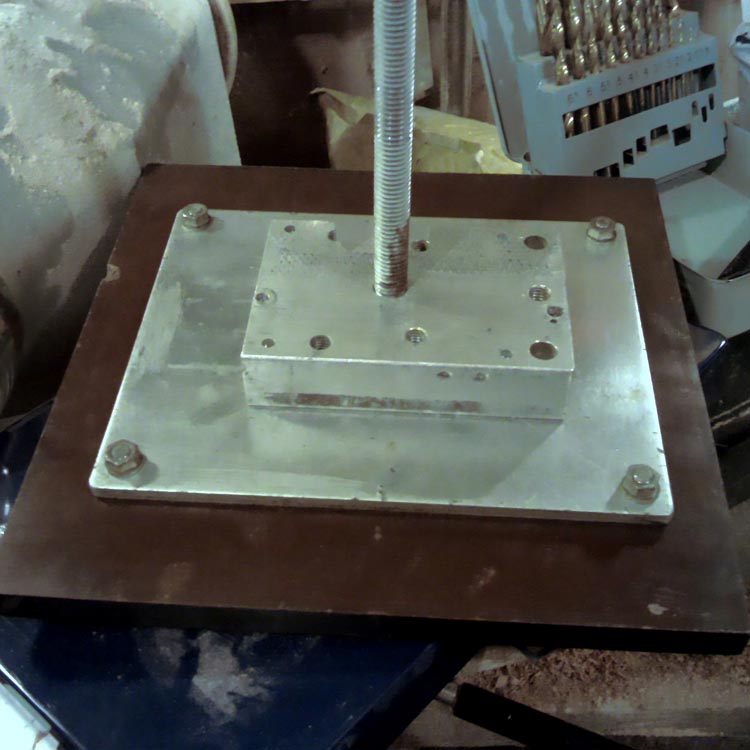
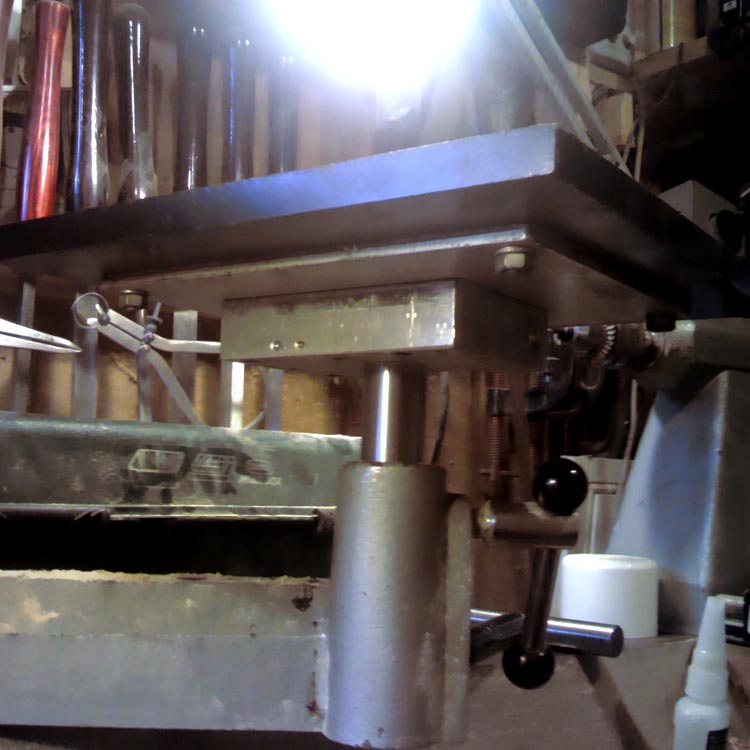
The top is a 10 inch square, half inch thick sheet of Bakelite which is bolted to a quarter inch thick aluminium plate. The plate is fastened to a 1 inch thick block of aluminium and it's hinged so it can tilt if required. On the opposite side to the hinges, I made a pair of lockable adjusters from steel corner brackets that come with metal shelving and they adjust at the bottom using bolts with wingnuts that fasten to a couple of scrap pieces of L section aluminium. The thick block of aluminium has an M12 thread cut into it which takes a long length of M12 threaded rod, The threaded rod screws into a 1 inch diameter solid steel post that fits into the toolrest mount on the banjo for my lathe. The threaded rod is prevented from loosening by a grub screw in the aluminium block and the steel post. Quite an upgrade isn't it?
Apart from the wingnuts, hinges and threaded rod, everything came from where I worked so I couldn't put a price on making it from scratch but it's one of the most useful bits of kit I own so to me, it's priceless. I don't use the tilt function very often and so I bolt that section down for extra strength unless it's needed.
If you have the Robert Sorby modular toolrest system, you could use the toolpost from that to build a table to suit your lathe as it's already got a good sized thread cut into the top of the post. Just a thought. You could make most of the upper section out of good quality plywood and just put a thin piece of steel, plastic or melamine faced chipboard on top to make the table surface hard wearing and low friction. Click on the pictures below for a closer look.

|
|
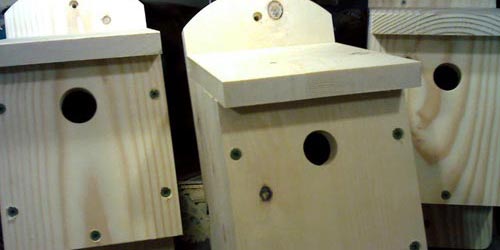
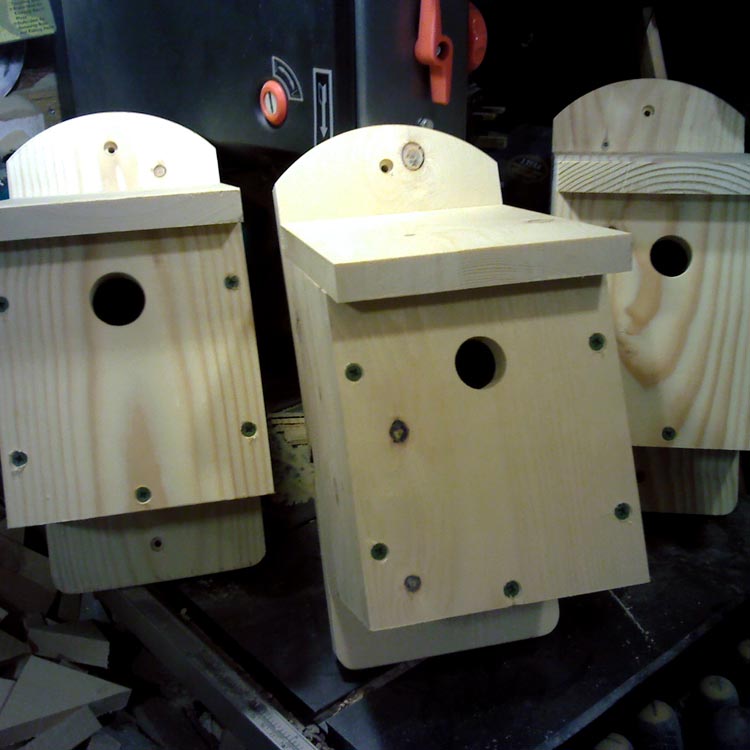
Bird Boxes
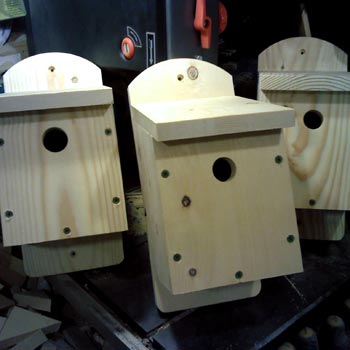
If you are interested in woodwork and are wondering what to do as your first project, bird boxes are a good place to start. Now it might seem a bit back to front that I didn't put this project at the top of the page but as I am primarily a woodturner, it made more sense to me to have a lathe based project first. Anyway, bird boxes are a good place to start for a budding woodworker because they can be made with just a few tools, quite a small amount of cheap wood or scrap wood, they don't have to be perfect and they will give you a warm, fuzzy feeling when you see them being used by birds in your garden!
All you really need is a pencil, a saw, a tape measure, a drill, drill bits, a hammer and nails. That will do on a very basic level. just choose a bird box plan with measurements on the internet and away you go. If you want to get a bit more advanced, a set square will help you to make straighter cuts and a screwdriver and screws will mean you'll be able to remove the front of the bird box to clean it out at the end of the season if you screw the front panel on.
Don't forget that each species of bird prefers a fairly specific size of hole in the bird box so look that up. Also, some birds prefer a side opening like treecreepers and others like the whole top half of the front panel open like blackbirds. Sparrows like neighbours so a long bird box with dividers is popular with them. Then there's bat boxes, owl boxes, dove cotes and so on. Like I said, bird boxes are a good place to start and as you get more confident, you can build bigger and fancier if you want to.
As I have mentioned before, I am lucky to have a fairly comprehensive range of tools but you absolutely do not need them for bird boxes, in fact, they can be a hindrance as I'm about to explain. I have used air staplers, a big bandsaw, my sanding disc and table (of course!), a pillar drill and cordless drills, a speed square, engineering squares, a mitre square, an adjustable square etc, etc. I even used my digital vernier callipers to check drill bit sizes. The main tools made the job a lot quicker but I ruined the time advantage by obsessing about ultimately meaningless things like a cut being half a degree out of square or one piece of wood being 0.25mm thicker than it should be. These details would be critical in other projects but I can't really imagine a sparrow looking at a bird box, shaking their head and thinking 'Look at that corner, bloody cowboy builders!'.
Once I realised that my over zealous attention to detail wasn't helping things, all the parts went together quickly and without complication.
Click on the pictures below for a closer look.


Gold!
I can't remember exactly how or when I actually got interested in gold prospecting but I am now. I'm not doing it because I think I'll make a fortune, I know I won't and that's quite liberating because I just enjoy the process and if I get a little bit of gold then that's a bonus. Don't get me wrong, I don't actually want to get skunked every time either! Anyway, I wanted to share something with you that's a little different to other things I do and I'm looking forward to getting the chance to do a lot of it when I move to Scotland!
In preparation for then, I have been reading a huge amount of information, practicing my panning technique as well as building and testing equipment such as sluices, hand dredges and classifiers. I am by no means an expert on the subject and I only have a little experience in the field but I have a basic grasp of physics, mass and fluid dynamics involved with making effective gold catching gear. Everything I have made has been tested with river gravel and sand which has been laced with a known quantity of lead nuggets, pickers, flakes and fines in a recirculating system. I painted them fluorescent orange for better visibility. As gold is heavier than lead, if my gear catches lead, it will catch gold easily. Makes sense, doesn't it? That's all well and good when I can control the flow of water by using a pump in a recirculating system but there are no 'perfect' rivers and streams with exactly the right flow rate, water depth or enough drop to put the sluice at just the right angle so I knew that I couldn't make just one sluice that would work at a 95%+ catch rate in any situation.
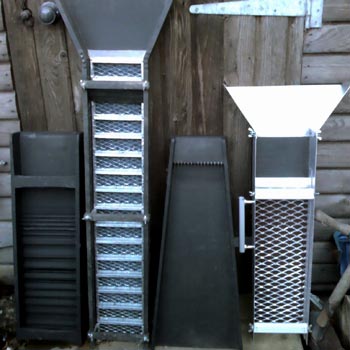
I figured that there are four main types of sluice with different benefits and drawbacks that I could use depending on the situation and conditions, they are (left to right):
Drop riffle - Slow flow, shallow water, works best when using classified material but can take unclassified, low feed rate, fast clean-out, small amount of concentrates, light, cheap and easy to make with the right equipment.
Hungarian riffle - Fast flow, steep angle in a stream or as a recirculating sluice, average feed rate, slow clean-out. Mine has 'Clarkson' style riffles in a mini 'long tom' sluice.
Fluid bed - Fast flow, deeper water, fast feed rate, fast clean-out, no classifying needed, heavy, quite complex to make, not easy to check if you are still on the gold without performing a clean-out.
Ramp Riffle. Good 'go-to' all round standard design sluice. Mine has some cool extra features that shop bought ones don't have though! Just for example, the riffle spacing can be adjusted in seconds or they can be totally removed as in the picture to run the sluice in beach box mode like they do in places like Nome, Alaska. If everything is removed and a cutting mat is installed, it also works as a miller table!!!
Most others are a variation on these from what I have seen available on the market. Long story short, I now have four sluices! There is a fifth in the planning stages for small scale testing but it will just be a smaller version of the drop riffle sluice with a few modifications. If it works out then I'll add it to this page when it's done.
In preparation for then, I have been reading a huge amount of information, practicing my panning technique as well as building and testing equipment such as sluices, hand dredges and classifiers. I am by no means an expert on the subject and I only have a little experience in the field but I have a basic grasp of physics, mass and fluid dynamics involved with making effective gold catching gear. Everything I have made has been tested with river gravel and sand which has been laced with a known quantity of lead nuggets, pickers, flakes and fines in a recirculating system. I painted them fluorescent orange for better visibility. As gold is heavier than lead, if my gear catches lead, it will catch gold easily. Makes sense, doesn't it? That's all well and good when I can control the flow of water by using a pump in a recirculating system but there are no 'perfect' rivers and streams with exactly the right flow rate, water depth or enough drop to put the sluice at just the right angle so I knew that I couldn't make just one sluice that would work at a 95%+ catch rate in any situation.
I figured that there are four main types of sluice with different benefits and drawbacks that I could use depending on the situation and conditions, they are (left to right):
Drop riffle - Slow flow, shallow water, works best when using classified material but can take unclassified, low feed rate, fast clean-out, small amount of concentrates, light, cheap and easy to make with the right equipment.
Hungarian riffle - Fast flow, steep angle in a stream or as a recirculating sluice, average feed rate, slow clean-out. Mine has 'Clarkson' style riffles in a mini 'long tom' sluice.
Fluid bed - Fast flow, deeper water, fast feed rate, fast clean-out, no classifying needed, heavy, quite complex to make, not easy to check if you are still on the gold without performing a clean-out.
Ramp Riffle. Good 'go-to' all round standard design sluice. Mine has some cool extra features that shop bought ones don't have though! Just for example, the riffle spacing can be adjusted in seconds or they can be totally removed as in the picture to run the sluice in beach box mode like they do in places like Nome, Alaska. If everything is removed and a cutting mat is installed, it also works as a miller table!!!
Most others are a variation on these from what I have seen available on the market. Long story short, I now have four sluices! There is a fifth in the planning stages for small scale testing but it will just be a smaller version of the drop riffle sluice with a few modifications. If it works out then I'll add it to this page when it's done.


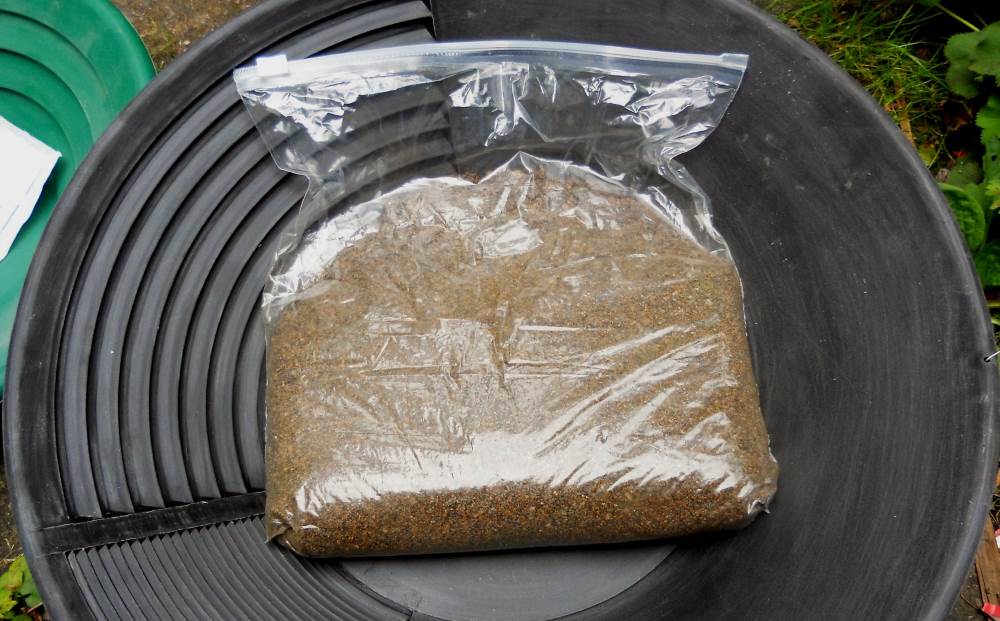
Gold Paydirt
Still on the same theme, I occasionally buy paydirt from Scottish sellers and enjoy spending a quiet afternoon panning it out. If you are at all interested in prospecting then I can strongly reccommend eBay sellers Jamesy7414 and Goldnugget aka Golddiguk-0. You won't get skunked if you buy from either seller. Below is my first paydirt review video where I go through a 4lb bag of paydirt from Jamesy and I've bought another 1lb bag from Goldnugget which I'll be doing a video for soon so if you don't want to miss that, subscribe to my YouTube channel (simply click the button below) and you'll know as soon as I've uploaded it. Here's some pics from the video to whet your appetite!


Drop Riffle Gold Sluice Box
 Click to download full size template.
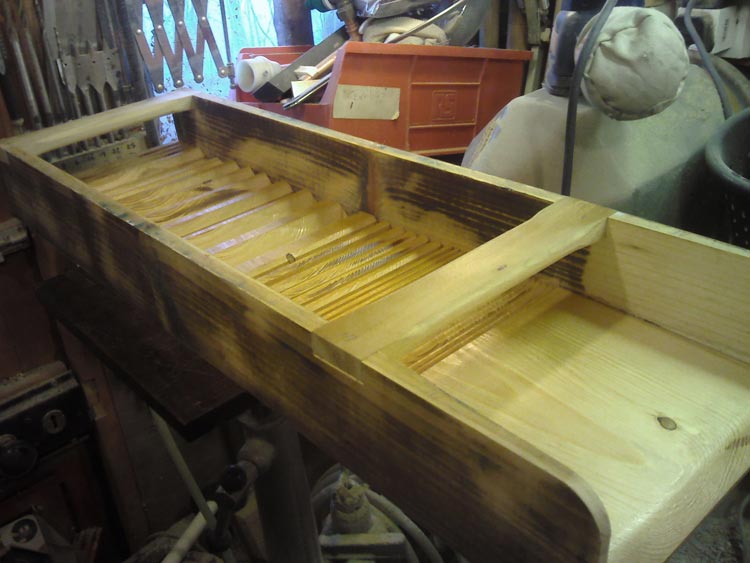
Out of the four sluices I have made, this was the easiest by far in terms of the actual build. It is only 5 pieces of wood after all. Working out and cutting the riffle patterns was the hard part but if you want to make one, I have added a downloadable template for the side profile of the riffle board for this sluice. Kind, aren't I?
I've called it the 'Ripsaw Sluice' as the side profile of the riffles look like a really vicious saw blade to me. I made the template image by holding my original hand-drawn cardboard template up to a bright window, taking a photo which I then overexposed to blow out the background, added contrast to and generally tidied up in Photoshop so the edge detail is nice and clear.
Here's the template, click on the image below then after the larger image appears, right click and select 'Save Image As....' You know the rest. You now have a 7249 pixels long by 1549 pixels tall, full size, high resolution copy of my template.
The finished sluice I made is 2 feet long, 7 inches wide and 3 inches high with an internal width of 6 inches so it's small, lightweight and fits into a large backpack with room to spare for gold pans and digging gear.
I spent hours watching Docs Gold Hog videos and reading Astrobouncers posts on Treasure.net (hi Jeff!) then I watched his videos on YouTube. Both are great guys and I unreservedly credit them for the pattern I came up with as it's a mix of their designs with a few of mine thrown in too. To make this, I used a slide compound mitre saw but you could use a tablesaw or a Skilsaw/circular saw or even a router and get very similar results.
If you don't have any of these tools or don't feel confident using them in the manner needed to make this sluice, You could make the body of the sluice with a plain board for the base and order some Gold Hog matting to fit it. I don't have the budget to do that at the moment especially as they are in the U.S. and shipping will be expensive so that's why I made mine instead. My experience with this sluice has been so positive that when I can afford it, I will be buying some Gold Hog matting. I'm not affiliated with Gold Hog but I know a good product when I see it! If you want to see their matting and other prospecting gear, CLICK HERE. (link opens in a new window)

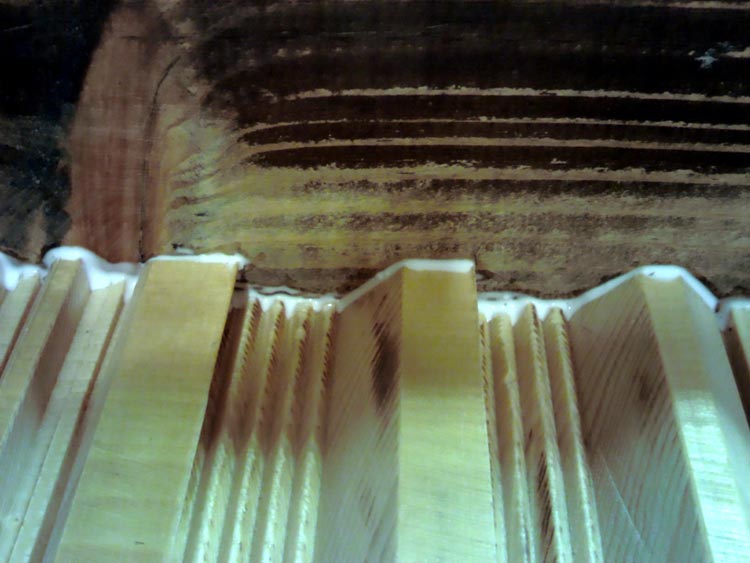
The most important thing is to make sure you are cutting as close to straight across the board as possible. There are many dozens of cuts very close to each other and you don't want them to wander into each other. Also, as you are cutting across the grain, a saw blade with as many teeth as possible will result in a cleaner cut (mine has 80 teeth on a 10 inch diameter blade) If you don't have such a blade, cutting slowly and smoothly will help. You'll see in a photo below that even with a good blade made for cutting across the grain, I still had trouble with chipping the edges and bits of the grain getting plucked out in places but it's not caused a problem in use and the sluice works just as I'd hoped. In fact, better than I'd expected. If you make this from a close grained hardwood, you should get much cleaner cuts. I used pine because I already had it so it was zero cost.
All you have to do is print the pattern out over 2 pieces of A4 paper and you will have a template to cut out that is roughly the same as I made by hand. It should end up around 2 feet long. You could stick the template to a piece of card before you cut it out then trace round it which would obviously last longer. All the cuts to make the various riffle shapes are either 90 degrees (vertical) or 45 degrees but some are 45 degrees to the left or right so trace the design on both sides of the board so you can work from either side as most saws only tilt one way. Also, If you are doing this with a router, you won't need to mark both sides but there are 1 or 2 shapes you be might not be able to make using a router alone but you might be able to adapt the design and come up with something just as good or better!
Look at the template carefully before you start and mentally go through the cuts you will make. It's easier to visualise this when you have transferred the design to the board. I really hope you are already familiar with the most important phrase in woodwork but in case you are not, here it is: MEASURE TWICE, CUT ONCE. One or two minor mistakes aren't a major issue but anything more could end up with you having to start again. I did all the vertical cuts first, then all the 45 degree left cuts, then the 45 degree right cuts. Excess material was then ploughed out with overlapping cuts.
Once I had the riffle board cut, I dug out a piece of 3 inch wide by 1/2 inch thick scrap pine (it used to be a narrow shelf around the living room, the riffle board was a 6 inch wide by 1 inch thick floorboard offcut) and I cut them to the same length as the riffle board. You don't have to do the next part but I did to help the sluice work in very shallow water. I tapered the thickness of the riffle board and the inside of the sides to make a slightly wider and lower top end for where the water enters the sluice. I did this with a hand plane, hand chisels and my ever useful disc sander. It only makes a slight difference but it does seem to help. The pictures below will show this better than I can explain.
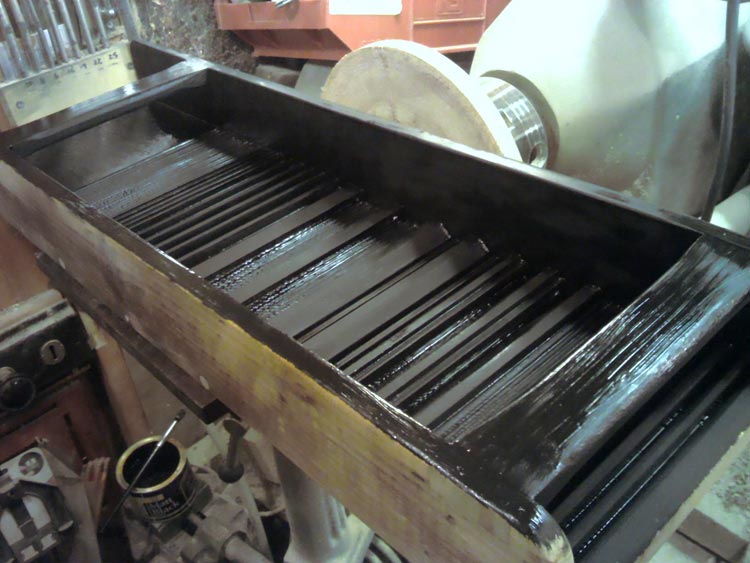
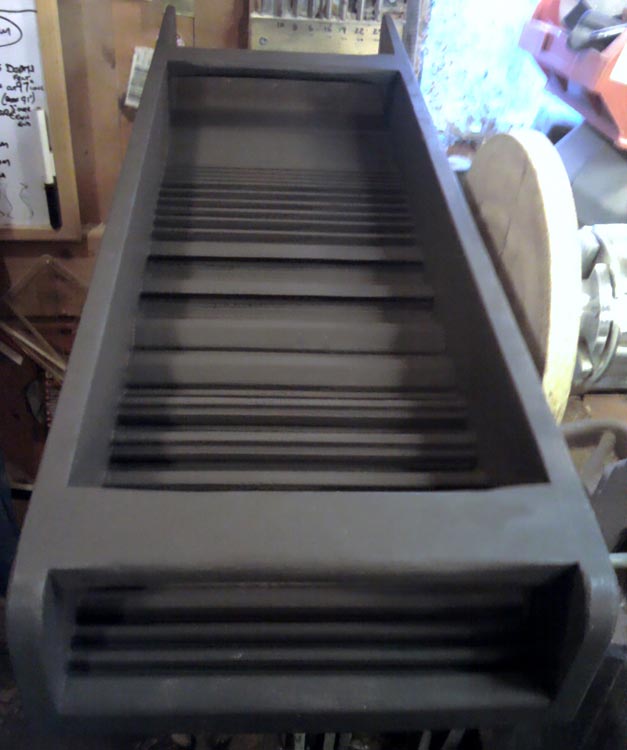
I then made a pair of supports that double as handles for lifting the sluice out of the water, glued and screwed everything together (only screw into the thickest parts of the riffle board and pre-drill to prevent splitting). I set the screw heads below the surface so I could put filler over them. I then gave the whole sluice a good sanding followed by 3 coats of blackboard paint. This has a slightly rough texture and can stop very fine gold from slipping off the surface and out of the sluice. You can make a miller table (Google it!) using blackboard paint as the table surface so it seemed like a good idea. It also is hardwearing and seems quite water resistant too.
When finished, this sluice works well if you feed it quite slowly and give the riffles time to clean out the 'lights' before feeding more. I classified down to 1/4 inch and in very slow, shallow water with about a 2 inch drop over its length, it was taking one heaped trowel every 10-15 seconds. Not exactly high production but certainly miles faster than I can pan! Obviously with faster, deeper water you could feed faster and get away with only classifying to 1/2 inch or not bothering at all if you like living on the edge! The slightly widened and deepened entry does help a bit but it's easy enough to use rocks from the stream to channel more water into it.
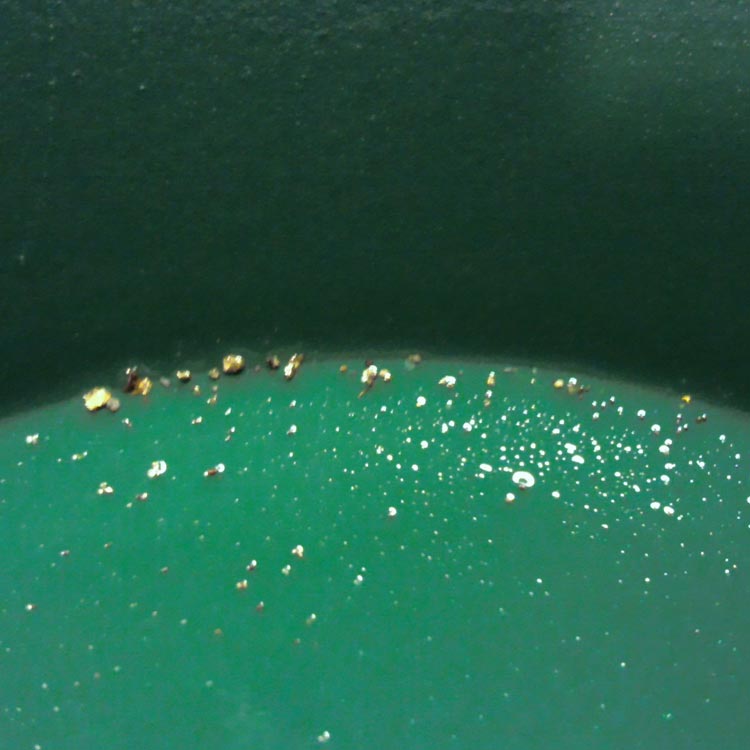
I used my fluorescent lead tracers in this and it caught all of them before they got half way down the sluice so that's good enough for me. You'll see the test in one of the pictures below. The chunkier tracers are clearly visible but the smaller flakes are buried in the sand. Click on the pictures below for a larger version.
I then made a pair of supports that double as handles for lifting the sluice out of the water, glued and screwed everything together (only screw into the thickest parts of the riffle board and pre-drill to prevent splitting). I set the screw heads below the surface so I could put filler over them. I then gave the whole sluice a good sanding followed by 3 coats of blackboard paint. This has a slightly rough texture and can stop very fine gold from slipping off the surface and out of the sluice. You can make a miller table (Google it!) using blackboard paint as the table surface so it seemed like a good idea. It also is hardwearing and seems quite water resistant too.
When finished, this sluice works well if you feed it quite slowly and give the riffles time to clean out the 'lights' before feeding more. I classified down to 1/4 inch and in very slow, shallow water with about a 2 inch drop over its length, it was taking one heaped trowel every 10-15 seconds. Not exactly high production but certainly miles faster than I can pan! Obviously with faster, deeper water you could feed faster and get away with only classifying to 1/2 inch or not bothering at all if you like living on the edge! The slightly widened and deepened entry does help a bit but it's easy enough to use rocks from the stream to channel more water into it.
I used my fluorescent lead tracers in this and it caught all of them before they got half way down the sluice so that's good enough for me. You'll see the test in one of the pictures below. The chunkier tracers are clearly visible but the smaller flakes are buried in the sand. Click on the pictures below for a larger version.

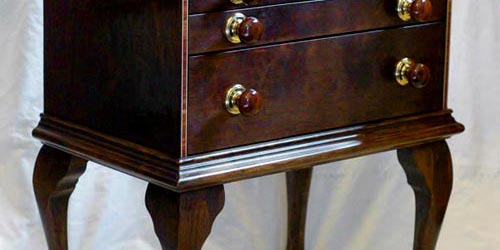
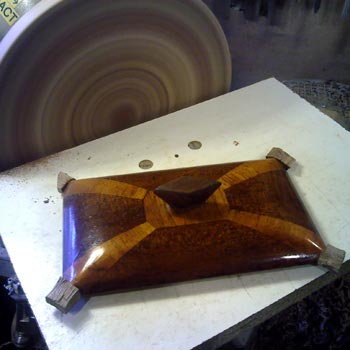
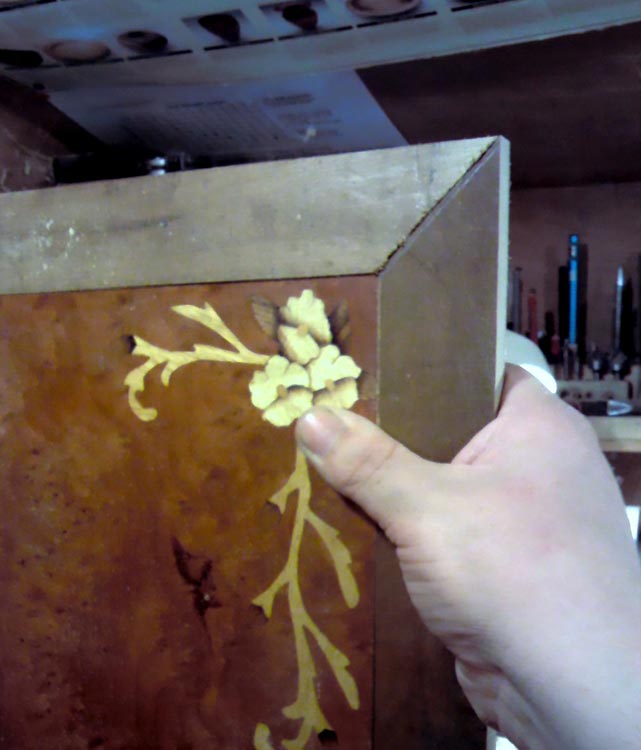
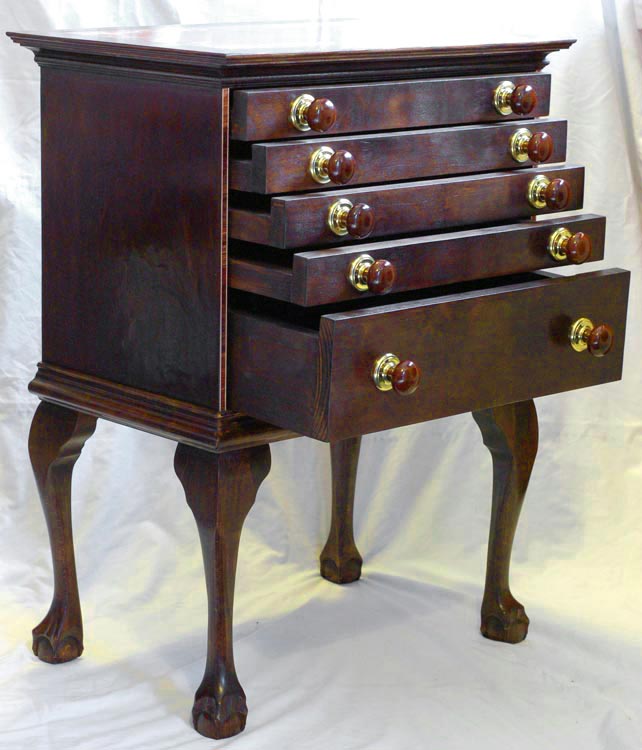
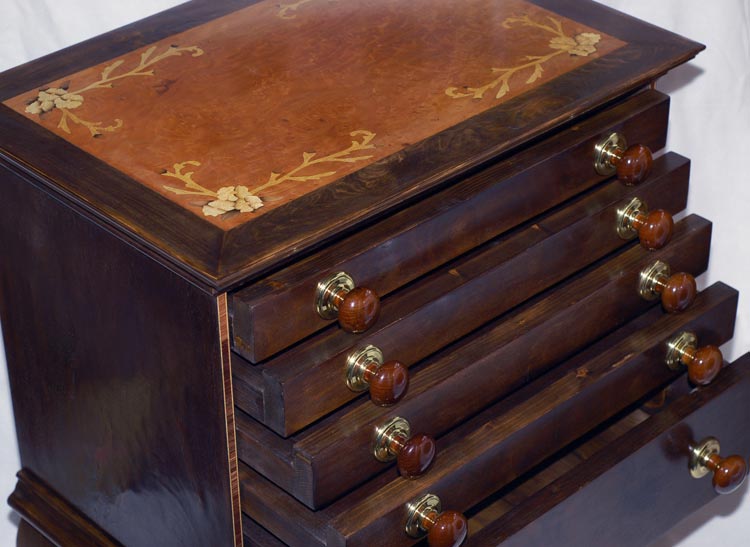
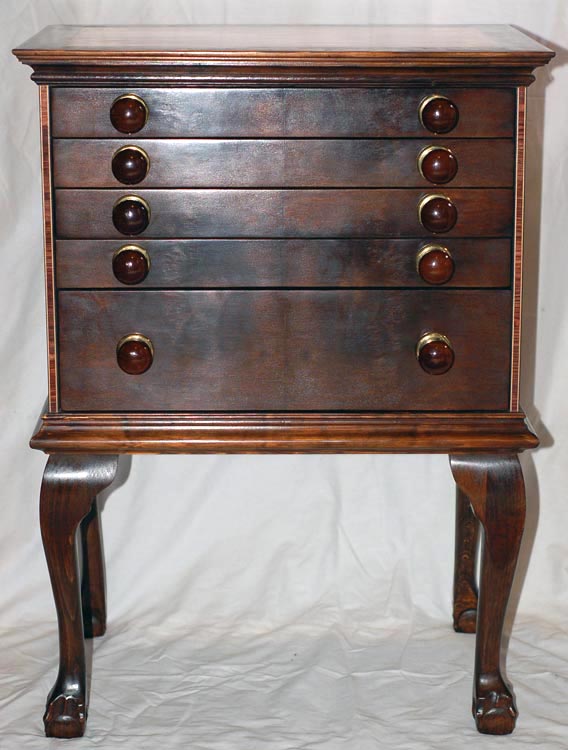
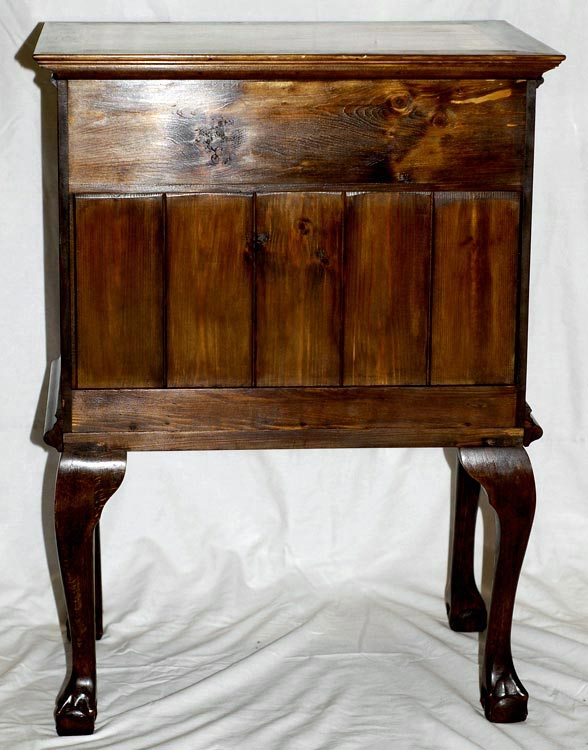
Antique Style Art Cabinet
Over the years I have accumulated quite a lot of art supplies and I've never really had anywhere proper to keep them so some got lost, some got damaged but the most annoying thing was trying to find the stuff I wanted when I felt like using it so I decided to do something about it. I could have just bought a cabinet but I'm sure you know that isn't my style by now! Me being me, I decided to add a complication which was to make it look expensive but actually cost as little as possible. In the end, it cost about £20 in total and I could have made it for free if I hadn't decided to spend a little to save time and add extra fanciness!
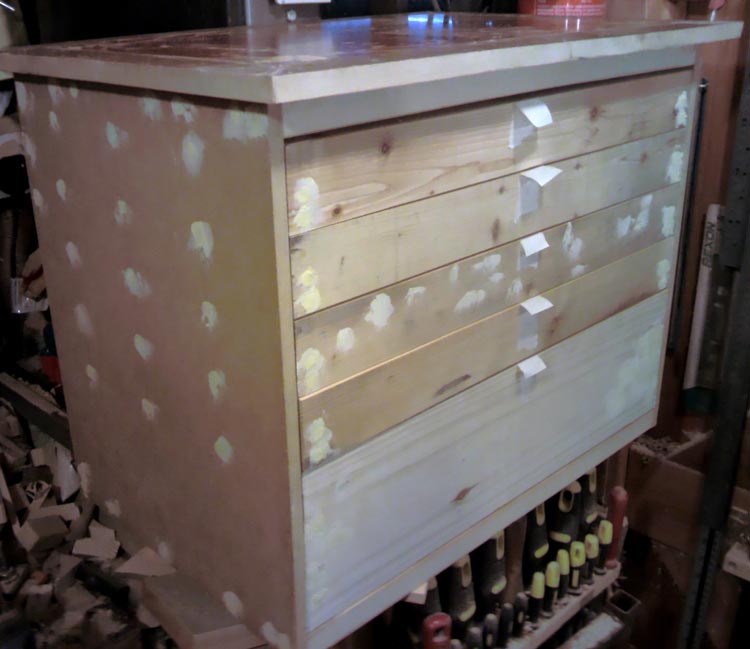
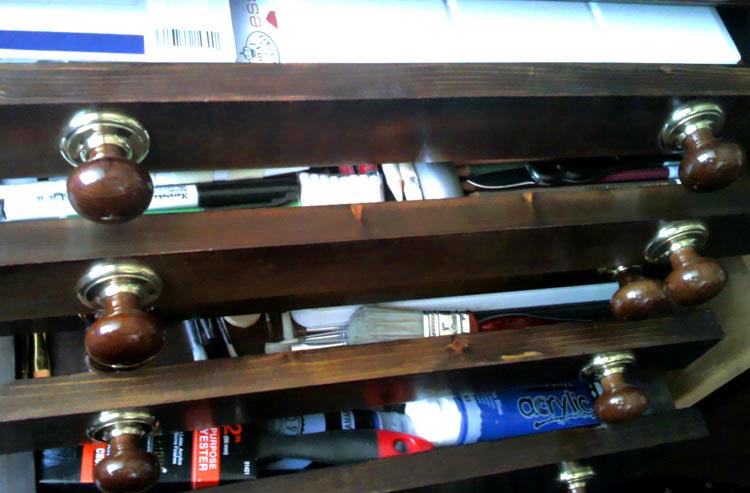
The finished art cabinet is 19 inches wide, 12 inches deep, the drawer section is 16 inches high and in total it stands 28 inches tall including the legs. The decorative trim adds about 2 inches to the width and depth. I based this cabinet on an engineers tool chest so the shallow drawers let you lay out everything so doesn't get buried (brushes, pastels, pencils, pens etc.) and the large lower drawer will fit the large tubes of acrylic paint, tubs of gesso and things like that.
Here is the finished cabinet. It has a birdseye maple veneer top with marquetry detailing, figured walnut veneer sides, bookmatched beech burr veneer drawer fronts, kingwood edge trim, walnut and brass knobs and cabriole legs with hand carved ball & claw feet in beech. Underneath all the fancy stuff is old floorboard offcuts, MDF previously used as shelf strengtheners in a factory, wonky strips of scrap cedar, warped plywood, warped cherry, cladding offcuts, beading offcuts, dado rail offcuts, some wood filler and contact adhesive! The legs cost me £10 for a set (I was going to make them from scratch but this offer was too good to miss. I did carve the feet myself though), the contact adhesive cost £5, the full set of 10 knobs cost £2 (thanks eBay!) and I bought proper Van Dyck crystals specifically to stain this cabinet which were about £3. Not too bad eh?
Everything else was stuff I already had so I can't really work out the total cost if you were to do this from scratch. You don't have to go overboard like I have with all the fancy stuff which if you don't already have it can end up being quite pricey, you could easily make something similar with pine, plywood and MDF and paint it if you prefer. Just do a decent job with the painting and nobody will know what's underneath it! I know that some people looking at this probably don't like how the finished cabinet looks but I made it for me and I like it and it serves the purpose I built it for perfectly so if you want to make something like this, just go for it and do it your way. Before I move on to the build, I'll leave you with this: don't buy timber from large DIY stores, it's massively overpriced and low quality, find a local timber supplier and you won't look back, trust me.
The Build
I first spent a lot of time gathering anything that looked like it might be useful and like with my turned work, I didn't make any plans or drawings, I just had an image in my head of what I wanted to build. I don't recommend this approach to anybody but it's something I have got a lot of practice in. When you regularly use scrap and reclaimed material, plans are something you can't always stick to as you have to use what you have, not what a piece of paper says so it just becomes second nature to improvise and adapt.
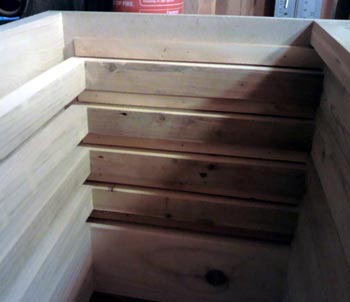
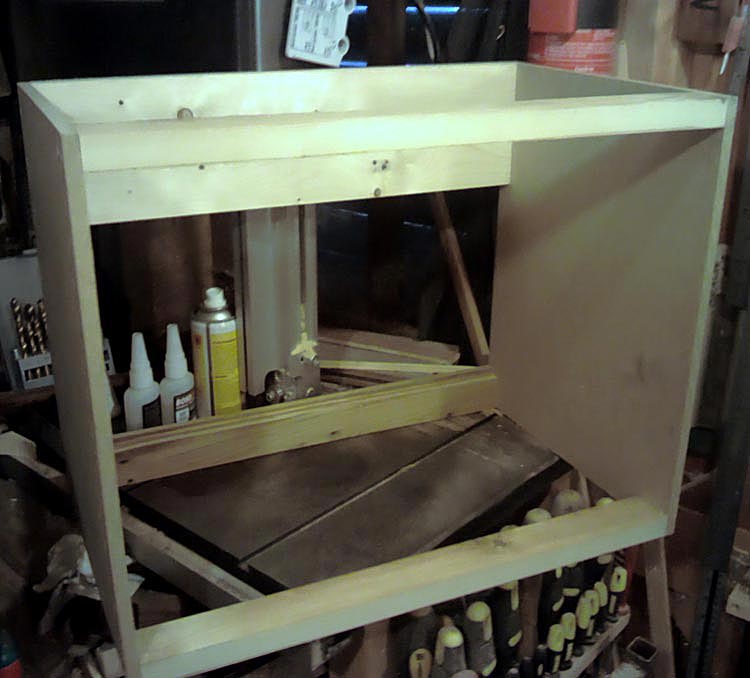
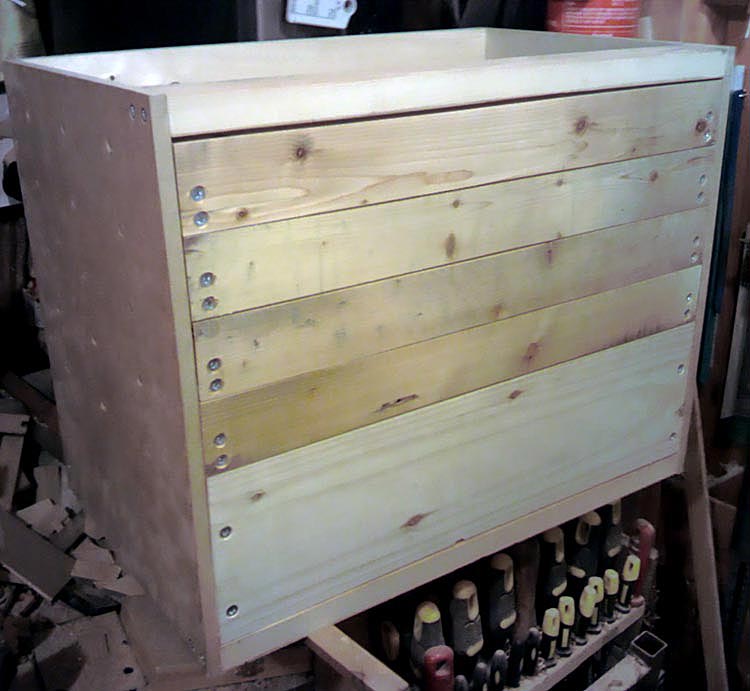
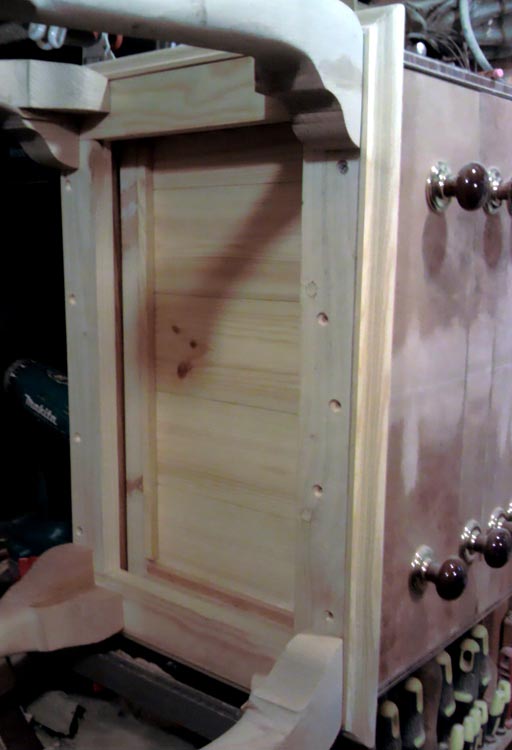
I had a piece of MDF that I cut in half for the sides then I cut down a length of floorboard into 2 by 1 inch pieces for the top and bottom crosspieces of the front, I cut just the tongue off of another floorboard but left the groove and used one of the other 2 by 1 inch pieces I first cut that had a groove for the top and bottom crosspieces of the back with the grooves facing each other. I then cut 5 offcuts of pine tongue and groove cladding to length which fitted into the grooves of the back crosspieces. The cladding had cupped a fair amount over time so I flattened the ends with the disc sander until they were a snug fit in the grooves.
Next are the drawers and drawer runners. I made the drawer frames from floorboard offcuts and the runners used to be spacers to hold wooden panelling onto a brick wall. I can dovetails by hand and I also have a dovetail jig for my router but I just screwed and glued the drawer frames together as it was quicker. I then pinned and glued small 1/4 inch square section strips of wood on the inside bottom edge of the drawer frames to support the plywood drawer bases. Again, I could have routed a groove out instead but I didn't. In most of the drawers, the drawer itself weighs more than its contents so it's not a problem. The drawer runners were quickly sanded to straighten and smooth them over but not so smooth that they might cause sticking drawer syndrome. I used thin shims of wood to space all the drawer frames and runners evenly then superglued the runners in place. Once the glue cured, I used three 5/8 inch screws to secure each runner in place. By the way, you may notice that there is a large gap above the top drawer and the top crosspiece on the carcass in picture 2 below. It is intentional as the trim I used around the top of the carcass comes down to cover the gap and I used a thin strip of sapele to fill the gap under the crosspiece and support the trim. A-ha! I told you I was well practiced in making things without proper plans, didn't I? Look at picture 8 and you'll see that all the gaps are perfectly even around all of the drawers.
I first spent a lot of time gathering anything that looked like it might be useful and like with my turned work, I didn't make any plans or drawings, I just had an image in my head of what I wanted to build. I don't recommend this approach to anybody but it's something I have got a lot of practice in. When you regularly use scrap and reclaimed material, plans are something you can't always stick to as you have to use what you have, not what a piece of paper says so it just becomes second nature to improvise and adapt.
I had a piece of MDF that I cut in half for the sides then I cut down a length of floorboard into 2 by 1 inch pieces for the top and bottom crosspieces of the front, I cut just the tongue off of another floorboard but left the groove and used one of the other 2 by 1 inch pieces I first cut that had a groove for the top and bottom crosspieces of the back with the grooves facing each other. I then cut 5 offcuts of pine tongue and groove cladding to length which fitted into the grooves of the back crosspieces. The cladding had cupped a fair amount over time so I flattened the ends with the disc sander until they were a snug fit in the grooves.
Next are the drawers and drawer runners. I made the drawer frames from floorboard offcuts and the runners used to be spacers to hold wooden panelling onto a brick wall. I can dovetails by hand and I also have a dovetail jig for my router but I just screwed and glued the drawer frames together as it was quicker. I then pinned and glued small 1/4 inch square section strips of wood on the inside bottom edge of the drawer frames to support the plywood drawer bases. Again, I could have routed a groove out instead but I didn't. In most of the drawers, the drawer itself weighs more than its contents so it's not a problem. The drawer runners were quickly sanded to straighten and smooth them over but not so smooth that they might cause sticking drawer syndrome. I used thin shims of wood to space all the drawer frames and runners evenly then superglued the runners in place. Once the glue cured, I used three 5/8 inch screws to secure each runner in place. By the way, you may notice that there is a large gap above the top drawer and the top crosspiece on the carcass in picture 2 below. It is intentional as the trim I used around the top of the carcass comes down to cover the gap and I used a thin strip of sapele to fill the gap under the crosspiece and support the trim. A-ha! I told you I was well practiced in making things without proper plans, didn't I? Look at picture 8 and you'll see that all the gaps are perfectly even around all of the drawers.

The top was next and this was tricky. The cherry edging was warped and it required a little persuasion to straighten up (I found half of an old, damaged display case dumped at the side of a country car park, free hardwood and doing my bit for the environment too!), I warmed and dampened the wood, supported it at each end with the curve from the warp facing up. I then slowly started adding weight to the middle of the wood until it was bending slightly downwards. As you can see in picture 5, I've found that you can never have too many good cordless drills like DeWalts and Makitas. They don't let you down and they also have a multitude of uses! I had other things to do so I left it like that for a few days and it straightened up nicely.
The main board for the top was originally a small table top and it had a decorative wavy edge, unfortunately, it wasn't big enough for my cabinet as it was (hence the cherry edge) so I cut the wavy edge off and glued the cherry to it. I cut and pre-drilled small blocks of wood and screwed them to the inside top of the carcass, 2 on each side and then screwed into both the main top and the cherry edging so it's well fastened together.
The next step was to fill any defect and screw head with filler so I had a good, flat surface to apply the veneer. I had countersunk all the screws so they sat below the surface which made life easier while filling and used a punch to sink the pins into the wood too. Once the filler had dried, I wrapped a block of wood with 120 grit sandpaper and made short work of levelling the filler with the surface and this also provided a good key for the adhesive after a good dusting of course!
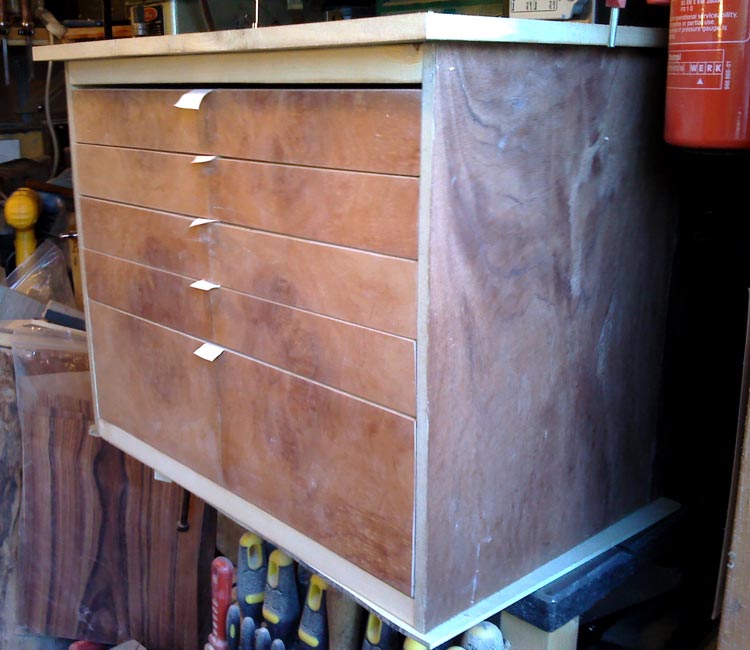
Having considered what options I had for gluing the veneer, I settled on contact adhesive. Not traditional I know but it works. I have tried in the past to use a few other adhesives and not had much luck on anything bigger than a postcard and I didn't have enough veneer to risk getting it wrong so I went for it and either I was lucky or it is a decent alternative to the proper methods. One concern I had is that I was using figured and burr veneer which goes crazy as soon as it absorbs moisture from some glues. This is why I used contact adhesive, BANG, stuck, done. You ain't moving! You only get one shot though so it has to be right first time and thankfully it was. I pressed the veneer down by hand at first working from the middle outwards then used a wooden rubber to really bear down and flatten it.
I did my first bit of bookmatching on the drawer fronts and that worked out as well. More beginners luck than skill probably though. I clamped the full set of drawers together with spacers between so the fronts were level and veneered the lot in one go then cut through the veneer between the drawer fronts to separate them. I then slightly sanded all the edges to round them over and make the veneer less likely to catch on something and tear off. The veneering was the single most tense moment for me during the whole build but I think I learned a lot while doing it.
The main board for the top was originally a small table top and it had a decorative wavy edge, unfortunately, it wasn't big enough for my cabinet as it was (hence the cherry edge) so I cut the wavy edge off and glued the cherry to it. I cut and pre-drilled small blocks of wood and screwed them to the inside top of the carcass, 2 on each side and then screwed into both the main top and the cherry edging so it's well fastened together.
The next step was to fill any defect and screw head with filler so I had a good, flat surface to apply the veneer. I had countersunk all the screws so they sat below the surface which made life easier while filling and used a punch to sink the pins into the wood too. Once the filler had dried, I wrapped a block of wood with 120 grit sandpaper and made short work of levelling the filler with the surface and this also provided a good key for the adhesive after a good dusting of course!
Having considered what options I had for gluing the veneer, I settled on contact adhesive. Not traditional I know but it works. I have tried in the past to use a few other adhesives and not had much luck on anything bigger than a postcard and I didn't have enough veneer to risk getting it wrong so I went for it and either I was lucky or it is a decent alternative to the proper methods. One concern I had is that I was using figured and burr veneer which goes crazy as soon as it absorbs moisture from some glues. This is why I used contact adhesive, BANG, stuck, done. You ain't moving! You only get one shot though so it has to be right first time and thankfully it was. I pressed the veneer down by hand at first working from the middle outwards then used a wooden rubber to really bear down and flatten it.
I did my first bit of bookmatching on the drawer fronts and that worked out as well. More beginners luck than skill probably though. I clamped the full set of drawers together with spacers between so the fronts were level and veneered the lot in one go then cut through the veneer between the drawer fronts to separate them. I then slightly sanded all the edges to round them over and make the veneer less likely to catch on something and tear off. The veneering was the single most tense moment for me during the whole build but I think I learned a lot while doing it.
I was lucky to find the knobs on eBay for a bargain price especially considering that I was going to make identical ones minus the brass backplates so I couldn't pass up that opportunity. They have a machine screw that goes straight through the drawer fronts and screw into a threaded steel insert in the back of the knobs, job done!
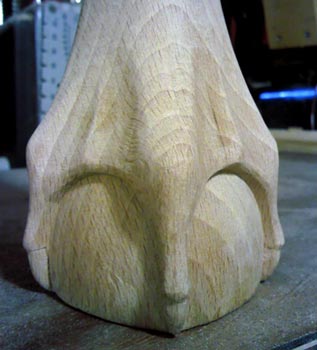
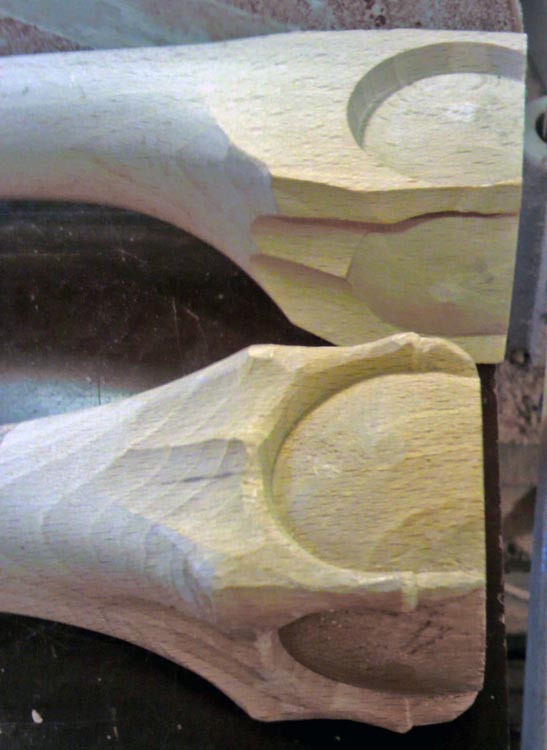
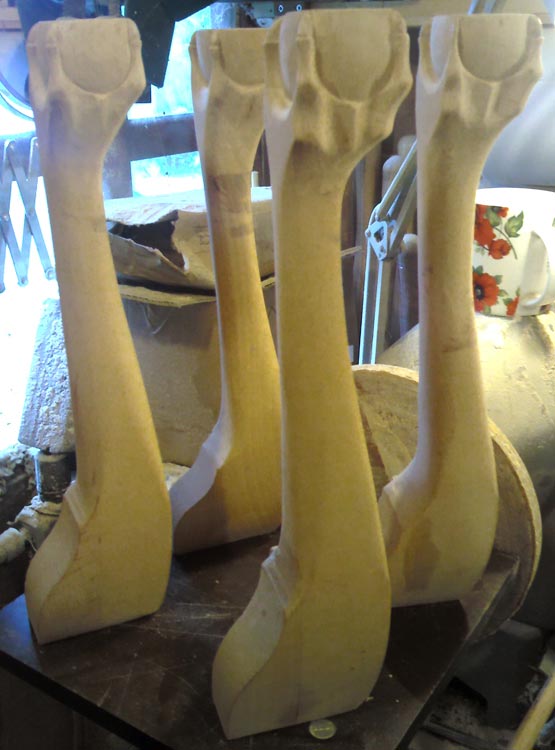
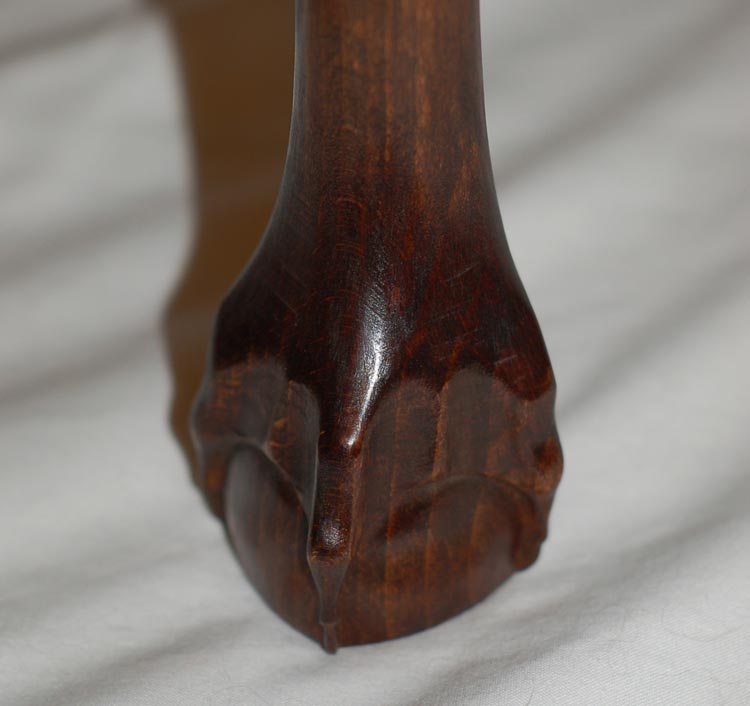
I was also lucky to be at my old woodturning timber supplier (now closed, grrrr!) when I noticed a bashed up cardboard box in the corner with cabriole legs in it which were the same length and style I was going to make myself. I was pleased that the foot wasn't properly carved as it gave me a chance to do a bit of carving which is something I don't get to very often. They're not perfect but I think they look better now than If I had just left them as they were. Once carved, I used my cool little cordless rotary tool with a sanding disc to smooth everything out. The very edge of the disc gets into areas I can't do a good job of sanding just by hand. When I had finished carving all 4 legs, I fastened them to a simple frame made of more floorboards cut down to size. Each leg has one 3 inch screw straight down and two 2 inch screws at a slight angle to hold them tightly to the frame, the frame then screws into the lower crosspieces in the carcass. Removable for transport but solid as a rock!
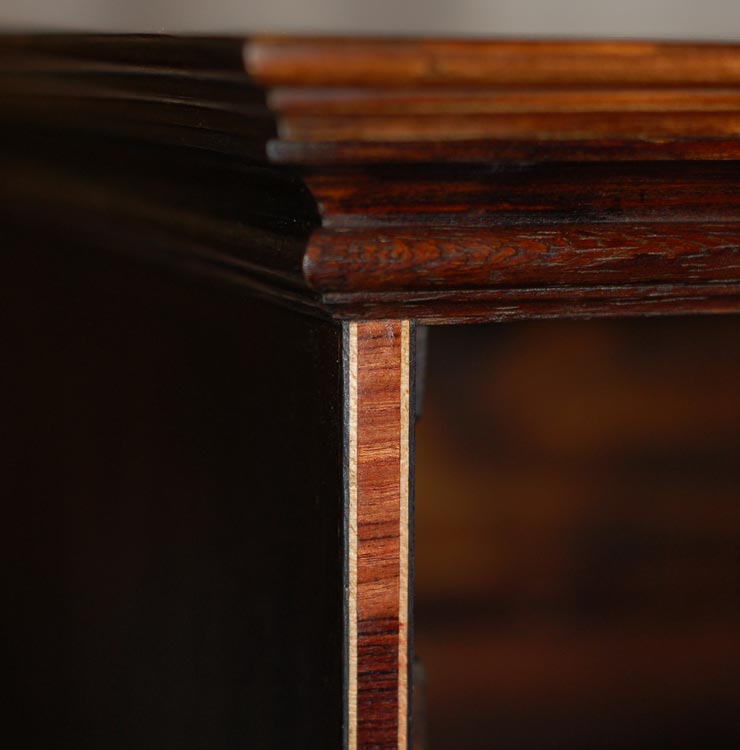
The finishing touches are strips of kingwood inlay trim down the front edges of the sides, dado rail around the bottom of the cabinet which hangs lower than the base to cover the frame for the legs, classical profile beading and a small cross-section piece of scotia moulding under the top (which also adds support to the cherry edging) and a section of fancy beading on the edge of the cherry. Everything other than the kingwood trim was glued and pinned with beading pins (the pins were also sunk and then filled), the kingwood was glued and taped while the glue dried.
After what seemed like days of sanding, I applied the Van Dyck stain. This is made from walnut husks and comes in the form of crystals which you then add to hot water in different amounts to make different shades of stain. I opted for the darkest out of the three shades I made and it worked well to blend all the different shades and colours of wood and veneer I used. I didn't want to stain the kingwood trim so I put a heavy coat of sanding sealer over it and masked it off. With it being a water based stain, it raised the grain so I applied sanding sealer once the stain had dried and sanded everything again. One coat of stain was enough so after sanding the raised grain, I reapplied more sanding sealer and cut that back with a red Scotchbrite cloth. I then waxed the whole cabinet, put the knobs on and I was finally done. Phew!
I'm really pleased with how this art cabinet came out and I use it regularly. If I feel like doing a pastel picture, I just pull the whole drawer out, put it at the side of me and everything I need is there and laid out ready to use. When I'm finished, I just slide the drawer back into the cabinet. Perfect!
If you're still with me, click on the pictures below for a closer look.
I was also lucky to be at my old woodturning timber supplier (now closed, grrrr!) when I noticed a bashed up cardboard box in the corner with cabriole legs in it which were the same length and style I was going to make myself. I was pleased that the foot wasn't properly carved as it gave me a chance to do a bit of carving which is something I don't get to very often. They're not perfect but I think they look better now than If I had just left them as they were. Once carved, I used my cool little cordless rotary tool with a sanding disc to smooth everything out. The very edge of the disc gets into areas I can't do a good job of sanding just by hand. When I had finished carving all 4 legs, I fastened them to a simple frame made of more floorboards cut down to size. Each leg has one 3 inch screw straight down and two 2 inch screws at a slight angle to hold them tightly to the frame, the frame then screws into the lower crosspieces in the carcass. Removable for transport but solid as a rock!
The finishing touches are strips of kingwood inlay trim down the front edges of the sides, dado rail around the bottom of the cabinet which hangs lower than the base to cover the frame for the legs, classical profile beading and a small cross-section piece of scotia moulding under the top (which also adds support to the cherry edging) and a section of fancy beading on the edge of the cherry. Everything other than the kingwood trim was glued and pinned with beading pins (the pins were also sunk and then filled), the kingwood was glued and taped while the glue dried.
After what seemed like days of sanding, I applied the Van Dyck stain. This is made from walnut husks and comes in the form of crystals which you then add to hot water in different amounts to make different shades of stain. I opted for the darkest out of the three shades I made and it worked well to blend all the different shades and colours of wood and veneer I used. I didn't want to stain the kingwood trim so I put a heavy coat of sanding sealer over it and masked it off. With it being a water based stain, it raised the grain so I applied sanding sealer once the stain had dried and sanded everything again. One coat of stain was enough so after sanding the raised grain, I reapplied more sanding sealer and cut that back with a red Scotchbrite cloth. I then waxed the whole cabinet, put the knobs on and I was finally done. Phew!
I'm really pleased with how this art cabinet came out and I use it regularly. If I feel like doing a pastel picture, I just pull the whole drawer out, put it at the side of me and everything I need is there and laid out ready to use. When I'm finished, I just slide the drawer back into the cabinet. Perfect!
If you're still with me, click on the pictures below for a closer look.


That'll do for now but there's plenty more projects to come!
Coming soon!
 Myford Restoration Coming Soon!
Anyone who knows me probably knew it was only a matter of time before my workshop would have a chunk of cast iron with Myford written on it. As much as I hate to be predictable, I can confirm that this photo was taken in my workshop! I'm working on this poor, neglected old girl right now but it isn't going to be your usual back to factory finish restoration, oh no, this ones going to be 'Super' (if you know what I mean!)
Stay tuned for my version of a Myford restoration with a twist and inspiration from Gone In 60 Seconds. I told you that I hate to be predictable, didn't I?
Stay tuned for my version of a Myford restoration with a twist and inspiration from Gone In 60 Seconds. I told you that I hate to be predictable, didn't I?
|
|
Amazon Affiliate Disclosure
PJN Woodturning is a participant in the Amazon Services LLC Associates Program, an affiliate advertising program designed to provide a means for sites to earn advertising fees by advertising and linking to Amazon.com.
PJN Woodturning is also a participant in the Amazon EU Associates Programme, an affiliate advertising programme designed to provide a means for sites to earn advertising fees by advertising and linking to: Amazon.co.uk/Local.Amazon.co.uk/Amazon.de/Amazon.fr/Amazon.it/Amazon.es.
You can read our full USA or EU Operating Agreement here: (USA) or (EU)
